

Kicking off my MG Build Fighters collection with the blandest Build suit of them all – the Build Gundam Mk. II. I’ve actually had my eye on collecting all the MG 2.0 Zeta-era suits for a while now, but I think I’ll be forsaking that particular lineup for this one, which does sport its own Zeta-era 2.0 MG anyway.
I picked up this particular kit at Anime Expo 2014, along with the MG Build Strike Full Package and the MG Universe Booster. No MG Sengoku yet, though at this point I’m waiting on a MG Build Burning more than anything else.

A little bit about the build – naturally the Build Mk. II is based off the original MG Gundam Mk. II, and therefore uses some older ‘pla technology and generally feels pretty dated. I’ll get back to this in more detail later, but I found it interesting that we still get some of the classic UC mesh tubing for this kit – haven’t seen any in a while.

This sticker sheet made me cry. The metallic green sensor stickers are easier to understand (though they still all come in solid gray plastic, not clear…and I’m talking on the new Build Booster parts too) but seriously is it too much to ask for some yellow pieces to fill in for those gnarly stickers? Not that I used any since I painted everything in, but it’s still disappointing that the newly molded Build parts alone would otherwise require more than half the stickers shown here.

Complimentary 1/100 Reiji figurine included with this kit, but this doesn’t make much sense when the MG 1/100 kit is actually technically bigger than the 1/1 Build Gundam…since in-show its true scale is in 1/144…

We also get a little runner dedicated to backpack connections – these pieces basically let you connect the Build Booster Mk. II to almost any post-2010 MG. It’s a nice addition, but not one that I care for, since I’m not the biggest fan of backpack-swapping.

With all that said, here’s the actual Build Gundam Mk. II. As I mentioned earlier, this kit uses a dated base model – the original MG Gundam Mk. II 2.0 came out in 2005 – nine years ago. The only new things we get are a few Sei Iori brand custom armor pieces and the Build Booster Mk. II.

All the original Mk. II pieces are included, allowing you to create the regular version of the suit if desired, though the colors are a bit off from the AEUG version.
Opening cockpit feature included, even though this kit is really a model of a model, rather than the usual model of a war machine.

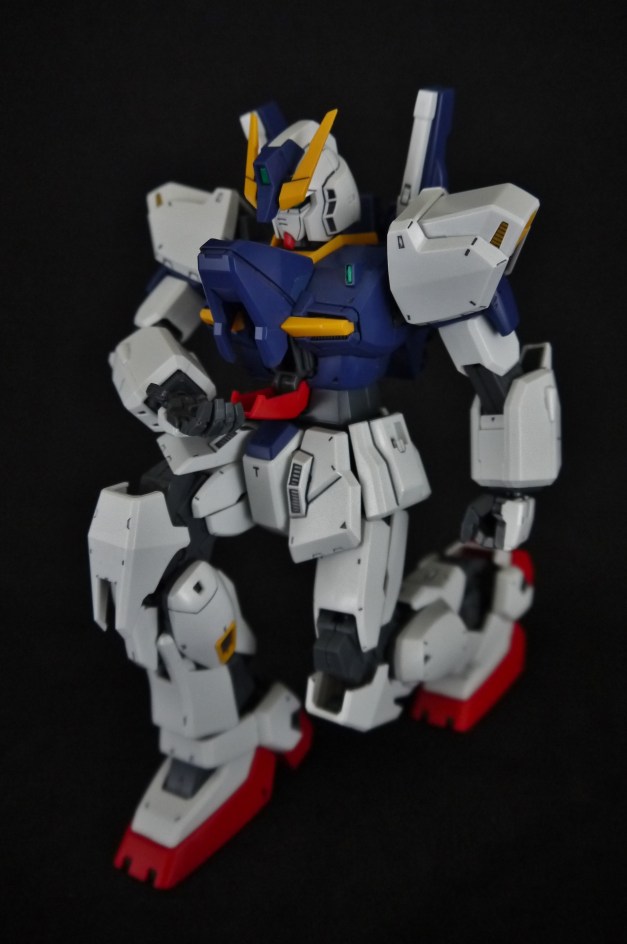
Despite the dating of the kit though, I have to hand it some props for some of its framework, particularly in the sexy sexy legs. I’m loving the wire mesh used in the knees and ankles, plus the layered mechanical look that’s partially exposed by the armor. The chrome pistons were also a nice touch, though this is really pretty standard MG fare.

Went ahead and painted the thrusters in all black, added some red for the innards, and painted the interior rims gold. Seems a bit overkill for just the thrusters alone, but the nubs seriously irked me, so much so that I simply had to do away with all of the original coloration.
The irony when I didn’t care to cover up that nub on the bazooka holster sticking out there. While the Mk. II can carry its hyper/clay (seriously I can’t tell which one it is) bazooka on its rear skirt, I never bother for that function since it has plenty to play with in the Build Booster Mk. II.

Speaking of which, Booster equipped. Looks much more flushed out now, no?
I’ll say this now – I actually really like the Build Mk. II’s design. The color breakup between the navy blue, gray, and white is nice, and I’m a fan of the blockier, stockier Gundam look, as opposed to the sleek and skinny suits we see a lot of nowadays.

However, speaking practically, it’s also a very lazy design.
In-series, this is Sei’s backup suit for when the absurdly overpowered and God-tier can-punch-its-way-through-anything Build Strike is damaged. You figure he’d be able to add some other genius system to the Build Mk. II or at least incorporate one of the Build Strike’s unique systems into it, but all he does is tack on a plane to the back, change some armor for purely cosmetic purposes, and add two large beam rifles.

I’d argue that the original Mk. II is on-par in performance with this supposedly souped-up custom, given the Build Mk. II doesn’t even retain any of the original armaments in its standard take-off loadout. All in all it’s just a normal, grounded suit with nothing truly remarkable about it. And make no mistake, while that’s not bad in and of itself, it just doesn’t make much sense to me why Sei would build a suit like this when he had the potential to do so much more, and clearly had the time to do so.
But I digress, we’re talking about the MG kit here, not about the sensibility of the suit’s in-series appearance. My apologies.

The Build Mk. II’s main armaments are its Beam Rifle Mk. II’s, both attached to a movable shield unit. They can be clipped onto the Build Booster for storage or taken off and pegged into the arm cuffs for wielding. Unfortunately, the connection to the Build Booster is extraordinarily loose, prompting me to tighten the plastic around the area quite a bit.


Standard configuration, with the shields and rifles mounted directly on the underside of the forearms. The forearm clips are separate pieces that serve as in-betweens for the forearm and beam rifles.

Now onto the actual Build Booster Mk. II. This thing is really interesting – it’s technically a totally new mold for 2014, but it certainly feels like a 2005 kit.
The construction is almost primitive, with nothing really special or innovative about it. All the yellow bits were painted in by hand, along with some gray and the white on the tip of the booster. The green sensor pieces were also done in, and they weren’t even included as clear pieces – they were just gray blocks molded onto the rest of the pieces.
It feels like Bandai didn’t really try with the booster, just had to get its basic shape out there and called it a day.

I’ll also point out now that the central “cockpit” unit of the Build Booster (the segment with the white stripe on the nose) isn’t a regular part of the Build Mk. II; it’s only there for when the Build Booster is functioning independently, and thus becomes so much wasted plastic when not used. It can be put up on an action base, but the thing is beyond dinky and not really worth putting on display. It’s technically possible however, to tack it onto the Build Gundam’s back…but it looks so ridiculous I didn’t even bother trying to show it.
Long story short, it’s a dinky add-on that’s wasted on the Build Gundam’s normal configuration.

Even more wasted ‘pla when these add-ons and weapons aren’t used. It’s nice that the weapons are included, but the Build Gundam doesn’t use them in its regular form and there isn’t really a place to store them. The central “cockpit” piece is shown above separate from the rest of the booster. Given this layout of extras I figured I could make something happen…

With so many weapons and a plain ‘ol booster add-on, I thought it would made sense to combine the bunch and arm the support unit. None of the accessories were ever designed to do this though, so naturally I had to scrap something together to make it all work. I wasn’t about to just glue the bazooka onto the craft’s nose and call it a day.

Fell back on pla-plates as usual and crafted a few connection points for the weapons, keeping in mind many of them were meant to clip onto the Mk. II’s waist anyway, therefore already sporting connection points I could work with.

The result: fusion achieved.
I had the Skygraspers from SEED in mind when tacking everything on; the original booster had the general shape anyway and I figured it made the most sense to attach the weapons to the tails.
The shield required no modding whatsoever; I just plugged the mount into the bottom of the booster and it fit perfectly.

The arm guards that served as the in-between points for the Gundam’s forearms and cannons used to be able to peg into the tail bits of this booster section, but since I kind of glued the connection point stuff on it did away with that feature. Not that it really matters, though its still destructive customization nonetheless.

I’ll point out that I kind of messed up when gluing things together; Krazy Glue has this gnarly habit of “frosting” over on some pieces if applied in excess. The glue stays where it should, but it releases some kind of weird white frost onto the surrounding pieces, marking some bits that were meant to stay stock. As a result, I kind of had to mix some paints and repaint the entire tail sides.
Thankfully the paint matched fairly well (not without a whole deal of trial and error to get the right shade of blue though) and with the weapons covering up those sections it isn’t greatly noticeable.


Ground poses are really interesting for this one; I’m actually not very fond of how (un)sturdy the Build Gundam feels. Unlike the MG SEED Remastered machines which all feel stiff and sturdy out of the box, this kit feels floppy and loose, likely thanks to its dated design.
This is usually a red flag for “don’t even think about ground posing lest you want constant ankle buckling and face-floors”, but surprisingly the Build Gundam holds its own despite having its soul bound by gravity. I guess all those mechanical shenanigans in the legs aren’t just for show.

Despite what I just said though, the Build Mk. II still looks best up in the air. The legs don’t quite stretch out as far as I’m used to or as much as I’d like them to, but they suffice.

A weird thing though – I’m not sure if the Build Mk. II just didn’t come with an action base connector for the crotch or if I’m missing it (too lazy to check the manual) but for this ‘shoot I actually had to go dig up some of those classic claw action base connectors.
Given how old this kit is I wouldn’t be surprised if it was released before Bandai began including specialized crotch clips, but the classic claw actually gets the job done well without obstructing any of the Gundam’s movement. Color me surprised.


The Beam Rifle Mk. II’s can also be removed from their movable shield mounts and used traditionally by hand, though I can’t imagine why this would be necessary in combat.

The beam saber mounts also remain unchanged from the original Mk. II’s configuration; still mounted on the backpack and capable of popping out a bit for ease of access.


Some saber fun, nothing special in the least. We get two beam effects as usual, standard UC beams. I actually don’t really like the Build Mk. II with beam sabers; the beam rifles are such a central part of the suit that having it use swords just seems…wrong. It’s like having the Dynames engage in melee combat.

So, all things considered? I’m actually a big fan of this kit. Less for the model and more for the suit aesthetics – as I mentioned above, I like the olden UC proportions and design, compared to most of my Gundams that have one form of anorexia or another. Next to the MG Star Build Strike (of which I’ve built and completed, though not yet photoshooted) I think it makes a sick display.
In all honestly I’m surprised the Build Mk. II even got the MG treatment at all, considering it isn’t even that popular a suit (let’s face it – the X Maoh and especially the Wing Fenice deserve a MG way more than the Mk. II ever will) but I suppose it was a way for Bandai to milk some cheap bucks out of a mostly preexisting mold.


2 Comments
darkandchoco/暗いとチョコ
Nice review and photos! 😀
Budi
supercool!