

The Acceleracers custom community has really taken off in the last couple of years – with the leaps 3D printing has made in the last decade, we’re getting builders producing life-size accelechargers, Wheels of Power, realm dioramas, even producing their own movie-accurate CM6 wheels for 1/64 Acceleracers customs. This project is that spirit taken up to 11 – what if we just, y’know, printed our own 1/18 scale Slingshot?

As far as I know, the Deora II was one of the only original Hot Wheels designs ever to be made in 1/18 scale – not even the infamous and arguably more iconic Twin Mill ever got a release larger than 1/24.
I wanted to make another 1/18 Acceleracer happen, to go with my 1/18 Deora builds – but how, when it literally hasn’t been made before?

The concept behind 3D printing seems relatively simple, right? If the model exists in 3D, we can print it, right?
Turns out, it’s not quite that simple.

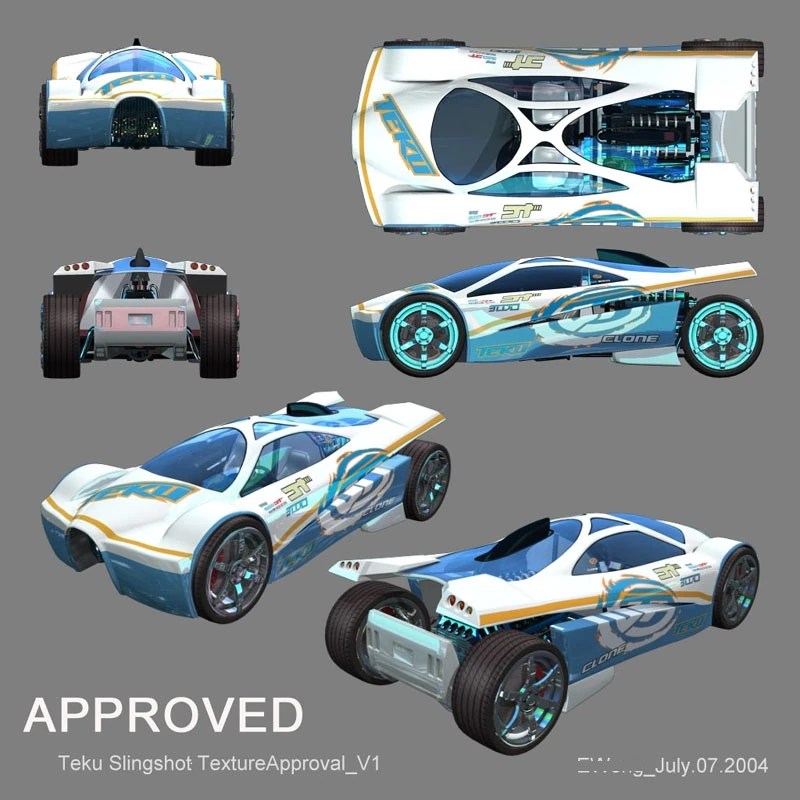
The very cool thing about the Acceleracers community is how much fan-made content is available online for a children’s show that went off-air nearly 20 years ago now. There’s a surprisingly vast amount of 3D models available on sites like Turbosquid and 3DCults of people who just fully 3D modeled Acceleracers cars – I had quite a few variants to pick from for Slingshot, the car I wanted to start with on this custom 1/18 scale journey.
This particular model I chose to work off of was modeled by a user named olavobtr, who has his designs available for sale on Turbosquid. The model here cost around $40 to purchase for the 3D files.

After grabbing the files, I taught myself some basic functions in Blender to clean up the model and split it into the components I would’ve wanted for printing – this means splitting the windows, headlights, wheels, and body from the chassis. My intent is to build this car as close to its function and form in the movies as possible, which means the body shell will be hinged to open up from the chassis plate as it does in the films.

Unfortunately, even after splitting the main parts, I couldn’t just send the model as it was to my 3D printer provider and have it spat out in resin – the core model itself was never designed for 3D printing, which means the edges and walls are all paper-thin, there’s tons of things that clip into each other inside the body, and all of the built out pieces are hollow inside, which will cause problems for resin printing since uncured resin will pool inside any hollow areas.

After spending way too much money to commission an actual 3D design firm to clean the model up and model it properly for 3D printing, here we are! They cleaned up the topography, combined the windows into one piece (very traditional Hot Wheels diecast style), and cleared out any hollow areas, along with thickening the body edges to at least 4mm for a reliable print.

It’s real! It’s physical!

I had sized the length of the car to the exact same as the 1/18 Deora II – it’s hard to actually scale these fantasy Hot Wheels cars “correctly” since they’re y’know…not real cars. In hindsight I think if I build this again in the future I’m going to size it down about half an inch – it’s kind of weird that it feels so massive next to the Deora II – the Slingshot feels like it should be a smaller, more compact sports car compared to the truck-style body that the Deora has.


Ironically, even after having the model totally reworked, it still didn’t come together perfectly out of the printer. The sides of the body shell make contact with the firewall in front of the engine, meaning the sides are flared out and don’t line up properly with the chassis plate.

The print itself is also quite rough – very thick and visible print lines – I’m used to near-smooth resin prints from my usual provider who seems to be able to do finer details, but at least this print is nice and sturdy, I’m not worried about handling it during the bodywork process.

The 3D design originally had the entire chassis plate visible under the body, but I’ll be cutting down a lot of that front section of the chassis plate to have it stuck in and hidden underneath the front bumper portion

Starting to cut down the sides of the body to make sure it fits over the chassis – notice how the 3D design team got around the flanks of the car being hollow by just…deleting the inside wall lol

I would’ve preferred these sections be printed in and solid, but it’s not a big deal – I just smoothed down the insides into a straight line and cut a piece of pla-plate to fit that will cover it all up so it looks solid.

Some details printed a bit weird, like that bent thin little bit that looks like…a belt? Between two pulleys? Hot Wheels fantasy stuff is weird.

I decided to cut it off entirely to have the engine look cleaner and started taking a dremel to the rear wheel hubs to grind them down so the wheels and brakes will fit.

Headlights came printed as separate parts, but the openings in the body shell for them are a bit too small, so I’ll have to enlarge those.

To achieve the body clam opening gimmick, I needed some kind of hinge mechanism that could be modular and small enough to fit under the front bumper area, while still being sturdy enough to lift the entire body shell. Enter…LEGO?!

I literally dug these decades-old LEGO hinges out of my childhood LEGO parts bin (which is why they’re not matching colors, but who cares), and epoxied them to the chassis shell. The little flat two-tile pieces up top on the edges are meant to give that area more surface area for epoxy when I attach it to the body side.

It was a bit of a shot in the dark lining these up and just praying everything would stay together and work the way I had intended once the epoxy had dried.

Is it stupid if it works?

I had originally actually planned to use this type of LEGO hinge connector (honestly LEGO gives you so many options for this type of mechanic), but figured the ones I actually went with would be beefier and less prone to accidental disassembly under the weight of the body shell.

The original print did come with the front grille slats printed, but I always intended to build this model with the opening front grille gimmick seen on the car in World Race, so I was always going to cut the original print grille out and design my own movable piece. In this case it’s just a piece of 1mm pla-plate I’ve traced into the shape and will be cutting out.

Building the actual grille slats out on the plate with thin 0.25mm thick pla-plate strips, cut to size. I’m using a pla-plate rod glued to the bottom to then create a scratch-built hinge mechanism for this piece.

A bit simple and crude, but it works – just two random 1mm thick plates glued into the sides of the grille with holes drilled out to accept the rod that’s glued to the actual grille piece – et voila, a hinged opening grille cover!

Onto the functional pop-up headlights – I’m actually stealing this mechanism idea from Tamiya’s 1/24 NSX model, which used this mechanic to operate its own pop-up lights. It’s just a bar glued to the bottom trailing edges of the headlight housings, allowing them to hinge up and down. The bar is bent slightly in the middle so as not to show with the grille bay open – this thankfully doesn’t affect the actual mechanism operation at all.

Functional!

For the taillights, I could’ve just left the staggered sized circles molded that came with the print and painted them in metallic red, but I wanted to go the extra mile – thankfully I had the exact amount of random red round taillights in my parts bin.
Seriously, I do not remember where these taillight units came from or why there’s oddly only a set of 3 (you’d think since they’re in pairs there would be 4), but they work in the perfect sizes for Slingshot’s tri-lights.

To make sure the taillights didn’t just look like a triplet of cylinders poking out of the back of the shell, I went ahead and built covers for the taillight section out of pla-plate. Normally this sort of detail wouldn’t really matter, but the problem is we’ve designed the canopy to open up, which means everything underneath will be visible – I can’t hide it all behind the curtain the way I usually do with a lot of my model undercarriages.

The base 3D model I worked with never had an interior to begin with, so I was always going to have to piece my own together. Starting with a set of Recaros and a Sparco steering wheel in 1/18 scale, courtesy TK Diecast, my usual 1/18 parts supplier.

I still needed a dashboard, steering column, pedals, and center console – not quite any parts that TK Diecast would be able to provide. I went hunting on eBay and managed to track down parts salvaged from other 1/18 models – a dashboard/steering unit out of an AutoArt Lamborghini Aventador! And an entire chassis plate with center console and pedals from one of those DUB-city style import JDM models – in this case an Acura RSX (Integra) DC5!

Everything does indeed fit! And looks to be the right size! No small miracle when I ordered these parts having no idea how they’d really go together with the rest of this completely scratch-printed chassis.

I really only bought the RSX chassis for the center console and pedals, but honestly the crazy speaker setup and nitrous tanks in the back totally rocked with the Acceleracers TEKU vibe. I didn’t plan on doing this originally, but found that the rear parcel speakers fit for a very nice set in the Slingshot’s “door card” areas. All I had to do was cut some holes in my filler pla-plate walls to slot these speakers in.

The Aventador dash did noticeably have a gap where the center console was supposed to attach. I’m filling this in by making it a giant infotainment screen instead – certainly fits the TEKU vibe, yes? The screen itself is just a 1mm square piece of pla-plate, with smaller bits trimmed to create a bezel that flows into the original opening from the dash.

The RSX console was a bit dinky looking in the big wide cabin though, so I opted to add some spacers to raise its height so there isn’t so much of a gap at the front to reach the dash.

The idea now is that the dash with the screen will slide right over that raised portion at the front, to give the look that the dash locks into place with the center console once the canopy closes.

Parts starting to get some paint. The seats from TK Diecast are their usual textured resin, which means they look like in-scale Alcantara material with just paint! No flocking needed to achieve this effect, which is very nice. The Aventador dash was repainted satin black to cover up the orange stitching print on the original piece.

For our giant homemade infotainment screen, I printed some generic TEKU sound bar background I poached off Google Images on my homemade water slide paper to create my own screen decal.

Adding some silver details by hand with a good ‘ol steady hand and brush.


For the record, I didn’t actually study the few glimpses of Slingshot’s interior we get in Ignition in any attempt to make it screen-accurate or anything – with my limited parts availability I wouldn’t have had that luxury for screen accuracy anyway.
JT is also now a seat manufacturer brand in my Acceleracers head-canon.

So, I didn’t build the opening grille in the body for no reason – we’re of course going to have all sorts of fun things coming out of it. This is really more of a World Race feature, since as far as I remember, Kurt never had a chance to use any of these fun gimmicks in Ignition when the car was actually TEKU.

I literally just went on Thingverse and started looking for random things that would be funny to see coming out of Slingshot’s grille that I could have resin 3D printed. The grapple claw is an obvious one in homage to World Race – I thought Mario Kart-esque item accessories would be fun, which is why I went with the Bullet Bill. From there, I remembered my childhood favorite Metroid games, and managed to find a 3D file of a missile expansion rendered from Metroid Prime. And of course, the minigun for maximum memes.


To mount all these accessories and have them sticking out of the open grille while also being swappable, I turned to the obvious solution – magnets! I’m creating my own plastic housing out of pla-plate (it’s literally like 20 1mm plates stacked, glued, sanded, and drilled out in the front), and sticking one hockey puck neo-earth magnet inside.

Each accessory will have a little zinc washer glued to the ends of it that will magnetize to this block – quick swap weapons!

For the wheels, I absolutely could have printed movie-accurate CM6-style wheels that match the movie model perfectly, buuutttt…I’m a dirty JDM fuckboi enthusiast before I’m an Acceleracers fanboy, so of course I’m opting to print TE37V deep dishes instead. I simply can’t fight my nature – plus, these are the wheels I’m running on my own MR2!

These prints come with separate hubs and lugnuts, which is going to be very nice for painting and easy color separation.

Complete brake set from TK Diecast! They do make some very detailed and very lovely functional brake systems, that are all designed to work together with their spinning hub system. The calipers and backs of the rotors are printed in resin, with proper photo-etched metal rotor faces.

I do want this model to be able to do as much as possible, which means spinning wheels and brake rotors, fixed calipers, and steering front wheels. The spinning wheels will be easy enough – the entire rear suspension hub from the original chassis print was grinded down and deleted; you wouldn’t have been able to see any of it behind the rotors and tires anyway. TK Diecast’s spinning wheel hub attaches to my custom resin printed TE37V hubs, which is then glued directly to the chassis.

The steering front wheels is…a completely different story. I’ve scratch-built my own steering mechanisms before in the past for cars that didn’t come with them, but this is especially difficult since it’s such an unconventional design and body.

The idea itself isn’t complicated – the wheel hub is glued to the brake rotor backing disk, which is sandwiched between some pla-plate spacers and a syrene rod that will plug into holes drilled in the top and bottom of the chassis, allowing each hub to pivot on the rod.

So…what I didn’t account for is the chassis front section basically being on the ground with this fitment, and with the way the car is designed to have a floor that goes all the way to the front where the canopy hinge mechanisms are, with no way for the wheel wells to connect that area the way you would have in a traditional car (because the actual wheel wells…lift up with the canopy lol)…there’s no room for the wheels to actually turn, even if I had the pivot mechanism in place lol.

For the proper placement of the wheels, they’d also be digging into my LEGO canopy hinges, even if they were able to turn inwards. Unfortunately, this means I’ll have to give up on my steering wheels dream – but we can at least still make sure the wheels spin!

I also realized after some quick test fitting that the original placement of my magnetic accessory box mount was way too low and would result in everything pointed upwards thanks to the upwards slant of the front of the chassis plate. I corrected that with some more pla-plate spacers and built up a “firewall” from scratch to hide the hinge mechanisms from view when the canopy is opened.

Also a useful area to mount the pedal assembly to! This whole thing really is just a hood to hide the mechanisms and shenanigans happening up front when the body is open and the cabin is on display.

The windows were all printed as one piece, in clear resin – this ironically looks a lot like the window piece in the original 1/64 Hot Wheels Slingshot diecast.
Unfortunately, while this is advertised as clear resin – it’s really more opaque, yes? Thankfully that’s fixable.

Oops lmao, the cutout for the top-mount engine intake is too small. I could have sworn it fit in the 3D model?? I’ll have to enlarge it by shaving it down until it’s wide enough with an knife.

The secret to making opaque pieces clear is a combo of sanding and clear coat. This principle works to restore real-life car headlights that have faded over time too. I started with 120 grit to take out a lot of the deeper print lines and support marks (the little dots you see all over the raw print are raised support points, like dimples), working my way gradually up to finishing with 800 grit before paint.

This is after the first clear coat check. It’s looking a lot better, but we can do better. There are clearly much deeper print line marks that I didn’t notice on my first pass, so it’s time to go in again and sand deeper. Very tedious process.

But so worth it. Voila, we can see now!

With the headlights installed and the body prepped, we’re finally starting to see some color – starting off with gloss white

Canopy glass sprayed with Tamiya’s Clear Blue lacquer spray.

Unfortunately after all my hard work getting the windows perfectly glass-clear, the clear blue paint somehow ended up turning it opaque again. 🙁
I eventually figured out that the secret is spraying the clear blue paint while the clear gloss is still wet – effectively “mixing” the clear blue paint into the regular clear. This allows the color clear to gloss up correctly, preventing the opaque color look we get here.

Top half masked off for the Brilliant Blue


Since I’m still using Tamiya spray cans like the caveman I am, it’s more difficult for me to get into tight areas like the tops of the bottom fins, without overcoating on paint. Took quite a few passes to get full coverage here.


Chassis/engine plate painted silver – that giant V12 is stunning in this finish.


Masked for semi-gloss black

I wish there was more room for detail with the engine, especially given how much of it will be visible (read: all of it) when the canopy is open, but it’s tough to come up with anything when it’s canonically just a giant silver lump, in the animation of the movies and of course from the original 1/64 diecast. To that end, I’m breaking up the silver a bit by chroming all of the piping. It’s a subtle difference sure, but I think it’ll add much needed depth overall.

Masked for the orange striping. These are much thicker than the similar stripes on the TEKU Deora II livery.

Finally onto the fun stuff! Just like before with the custom decals I used for all of my 1:18 Deora II customs, these decals are completely bespoke – designed by myself and printed by TK Diecast via their custom decal printing service.

The previous decals I had ordered from TK Diecast were all their “thin” print – which means they didn’t quite print as bold with colors, but are easier to work around complex edges and curves, on account of being thinner. This time, since Slingshot really doesn’t have any decals or designs that need to go over any complex curves or crazy folds, I decided to order their “thick” print. The most notable difference is how much brighter and solid the white on these designs are.

Slingshot does have a little blurb of sponsors right at the corner of its front windows that are rather indistinct, even on the official livery sheet for the movies. I replicated what I could (including yes, the double JT decals, the smaller one in red and the larger one literally right next to it in white), but decided to fill in the rest with a little creative liberty. The SHIFT DOWN and Power Max decals are actually from TK Diecast’s Initial D Ryosuke Takahashi’s FC3S RX-7 decal set.

Not a complex decal layout, but wow does it really bring the body to life.

Wet sanding the body with 1000 grit and polishing up for a smoother shine since I was getting some pretty bad orange peel with the final body clear coat, applied after the decals had set and dried. I try not to go too thick on the final coats of clear, since I’ve melted paintwork in the past with super hot coats. The downside is that you don’t get as smooth of a gloss out of the can, but nothing some buffing can’t fix.


Interior parts finally installed into the chassis. The dashboard is just resting on top of the scratch built front “firewall” section for now; once everything is finalized it will be attached to the upper canopy.

It took quite a bit of sanding to smooth Mr. Bullet Bill out – remember the raw print for this little guy was very…polygonal. After hitting the whole thing with Tamiya Gloss Black, we’re going in by hand with some good ‘ol white acrylic paint to bring out the details like the eyes and hands.

Printed my own homemade eye decals for the final touches.

Staying true to the Metroid Prime color scheme of the Missile Expansion here.

Wheel lips painted with Molotow Liquid Chrome, as is my usual MO.

Parts separation makes for such easy painting, I’m in love.

As I’m doing a final body test fit, I realize that the chassis floor isn’t quite flush with the body shell when it’s closed up. This normally wouldn’t bother me that much, but I think the idea of the chassis floor going all the way to the edge of the body still bugs me overall, since this was a concession we had to make during the original 3D model redesign process to make the body shell and chassis line up together. Really, this section of flooring causing this gap shouldn’t even exist.

So, uh, I guess it now doesn’t anymore. I don’t like making such big adjustments this close to the finish line, especially with all of the interior already glued in and set, but needs must – I literally just drew a line down the edges and took a cutting wheel to the chassis floor until the edges were deleted.

It’s now technically more accurate to how the car looks in the movies and to its 1/64 diecast counterpart – and no more unsightly gap!

The rotors were drilled out to accommodate the wheel hubs with the lugnuts – these will all be glued together as one piece, as it will all spin together on the spinning wheel bearings that will be attached to the body.

Calipers painted gloss red.

Peep my very technically sophisticated axle system (stack pla-plates behind the hub until desired offset is achieved).

So since the rotors and hubs are now attached to the chassis and on their own free-spinning bearings (the way it works on a real car), we need the calipers to “float” over the rotors while still being attached to the chassis. My solution was to just drill holes into the backs of the calipers and stick styrene tubes into them.


The tube stalks are then glued to the chassis. This is a ghetto approximation of how AutoArt models have their brake assemblies with spinning rotors.

Throwing some ENDLESS brake caliper decals on for that extra sauce. I was going to use some of my leftover Acceleracers decals on these instead but they all proved to be too large for the small caliper face surface, so Kurt’s getting the clouty ENDLESS branding instead.


Final look at the chassis before the body goes on. Everything from the engine forward was basically developed from scratch or pulled together from random parts, what a pain.


But so worth it.

What a surreal experience to see this project come to completion, and in scale with my 1/18 TEKU Deora II that I thoguht was a big undertaking 2 years ago. If you told me back then that I would be designing, printing, and modeling my own 1/18 Acceleracers from the ground up by now I’d ask you to pass the joint.


I’ve always adored Slingshot’s design ever since I was a kid seeing it on screen in World Race for the first time – it oozes fantasy exoticism that we only ever see in real-world concept cars that never make it to real production.

Hatch OPEN!

I’m so happy this feature ended up working in practice. It really was just a shot in the dark with the LEGO hinges and fitting the raw resin print together, hoping the chassis and body would somehow line up. This look feels so iconic to the car as it appeared in the films.

It does look a little sillier from the front lol. Face down ass (not) up vibes.


I really struggled trying to decide whether the dashboard should be mounted to the chassis portion (glued on top over the center console and remains in place) or attached to the canopy shell and lift up with the rest of it when the clam opens. It ended up being more of a practical decision – it was just easier to attach the dash to the canopy since it slot right in, versus having to scratch-build supports to hold it up over the center console.

Headlights go up :’D


I was worried that these headlights would look way too small on the body since they really are quite miniature – even though they’re actually quite small on-screen in the movies.

In the end, I’m happy with the look – the pop-up lights feel like a unique thing the animators put in for World Race anyway, who knows how much of an afterthought they really were.

Yes, I’m aware I didn’t drill the right side taillight set straight – the middle one dips slightly in line with the others. The resin in that area is so thin that I didn’t want to risk drilling it out further and breaking or cracking the edges, so it is what it is.

And of course – opening grille fun!

Kurt hitching a ride using the claw shot through the desert leg of the World Race will forever be iconic. Should I build a 1/18 Mega Duty next to recreate the scene?


Guns ‘n missiles feel pretty on-brand for Kurt. No, I didn’t create the energy-slingshot-cannon-thing he actually used in World Race, just because I really didn’t want to go through the trouble of scratch-building that plasma ball cannon thing – these accessories were just made out of whatever I could easily 3D print and paint up quickly.


Is…is that…Mario Kart music?!

Funnily enough, the original 1/64 Hot Wheels diecast version of Slingshot features double staggered wheels (larger rear diameter than front diameter wheels), but the actual movie model of Slingshot as it appears in Ignition shows it with a square setup (same diameter front/rear wheels). I’m a whore for double staggered setups (both of my own mid-engine cars are double staggered in real life), so of course I prefer to do the same here.
In a massive twist of irony, I actually realized near the end of the build that the movie version of Slingshot that my 3D model is based off of actually has square wheels – the front and rear are clearly the same diameter as it’s animated in the movies, a big departure from the more exaggerated proportions of the 1/64 diecast.

Technically the wheels are still double staggered – the rears are like 2mm bigger than the fronts. I originally had much smaller front wheels, but upon test fitting, they looked way too dinky in the wheel wells, so I upsized them to nearly the same size as the rears. I also wanted to avoid making the rears too large since it would look silly and donk.

In keeping with my JDM hotboi roots though – notice that the face concavity is still staggered front/rear, with the fronts sporting a much flatter wheel spoke face than the concave rears. This was very deliberate as a nod to aggressive staggered face setups you see with a lot of traditional JDM builds.

The 1/64 design is much sleeker and flatter than the movie-esque proportions my model draws more inspiration from. At first I was worried this would make the car look fat and stubby, with the broad sides, but I do think the livery and design of the body striping is pulling a lot of the weight still making the car look low-slung.

Don’t talk to us or our sons ever again.

The 1/18 Deora II feels like a cakewalk now compared to all the work that went into this build. I’ve gotten tons of requests already asking if I’d sell this piece or build another on commission – and unfortunately at this time I’m really not looking to do something this intensive again. This build took 2 months just on its own, and there’s no guarantee I’d be able to source the same parts again (like the AutoArt Lambo dash and RSX console).

Still, I half-built this just to see if I could, and now that I’ve figured out the gist of what it costs and what it takes to build something truly bespoke, I’m looking forward to trying my hand at some more…traditional Hot Wheels designs going forward. Maybe something that oozes Power and Rage?

Has anyone seen Gelorum? Kurt just wants to talk…


