

Nothing but Build Customs lately, and it’s a wonderful feeling. Officially my fourth 1/100 Custom kit, this time it’s from something a bit farther down in the UC Era – the infamous F91.
I got this one at Anime Expo 2014, from the Robo Toy Fest booth, in a very similar fashion in which I obtained the 1/100 Duel. As always, the kit was pre-assembled and haphazardly thrown into a plastic baggie inside a massive bin of old Gundam figures free for customer churning. Given the state of the kit, I managed to snag it for $3! Crazy steal, I’m loving the RTF guys more and more.
The F91 as I bought it. This kit is old – 1991 release. The proportions and general look of the suit are actually really nice though – how does the F91 manage to look so sleek and relatively well-aged while the HG 1/100 Master Gundam released in 1994 looks totally proportion-nerfed?

This one actually came with a very impressive weapons loadout – I’m probably not even going to display it with the beam shield or bazooka, but it’s nice that they’re included. As shown, only one VSBR is included, which was a crucial point when it came to negotiating the $3 price point. I had special plans for the VSBR the moment I saw that one was missing though, so it wasn’t such a big deal.

Quick disassemble. The moment I started taking this kit apart, I realized something was off…

As I tried to remove the red chin piece on the head, I realized that the red plastic looked…merged with the white. My first reaction was complete confusion, as I thought the previous owner glued all the pieces together, but a quick glance at the manual that came with this revealed it: this kit is molded in multi-colors.

My mind was nothing short of blown upon that realization. I’ve never actually seen Bandai do this – as far as I knew only Kotobukiya molded their kits with various colors on the same runner or piece. But to see Bandai incorporate it – on a 1991 HG kit no less – that was shocking.
The F91 on the shoulders is done by plastic, not stickers or decals! It looks like the letters were carved out of the white shoulders, with the red letters being separate plastic that was fitted in perfectly smoothly. Looking at it from the exterior, I would have never guessed – there isn’t any indication of level difference in the plastic or seams between the letters – they legitimately look painted on.

The torso block is like, five pieces. Usually it should be way more with that amount of color separation, but almost all the gray (including the neck post and the entire abdominal area) is merged with the white parts as singular pieces. The gray arm pegs are also merged with the blue pieces. While this method does allow for greater color separation, I don’t see why Bandai couldn’t have just included a separate gray runner and had us put it together ourselves.

I mentioned above how I first thought the previous owner had glued the pieces together when I saw the multi-colored pieces. Turns out, he actually did glue the ones that were just pegged on. This made disassembly quite a bit more complicated than it should have been, as I ended up having to saw off like every single peg on the kit.

Hard to see here, I know, but the v-fin was actually cracked and a bit smashed. Must’ve been from all the tumbling in a plastic bag. Thankfully it wasn’t actually broken, so some glue made it a quick fix.

The single VSBR (Variable Speed Beam Rifle, for those unfamiliar) was actually broken at the connection peg to the suit. Again, there was only one so this thing will end up going unused and become scrap anyway (no way in hell am I making another one of these out of clay or pla-plate, opening gimmick and all), but I had some fun playing around with it and using it as reference.

Parts split and bagged. Obviously this paint scheme will be based on the F91 Imagine from Gundam Build Fighters, though I am repainting everything. There were some random spots of glue on a lot of the pieces that had to be sanded away, so even the white areas will be hit with another coat of white.

All the parts that’ll be given that white coat. Given that they’re already white, one coat should be enough, just to give everything a consistent finish. The multi-color pieces do put a significant damper on masking and painting, since a lot of the molded-in gray would be a royal pain in the arse to actually mask. I’ll talk about my solution to that later.

These woud be the oddball pieces out. This thing came with semi-working hydraulic pistons in the ankles! They’re almost totally hidden behind the ankle armor so there’s almost no reason to include functional ones that actually move, but Bandai really stepped it up with their kit quality here. After going through the Master Gundam, I was totally expecting an older kit like this to be just about devoid of any semblance of mechanical detail, but I’ve been happily proven wrong.

The rear leg thruster flaps and the feet split in half. Once again, the feet are also multi-molded; the white and red parts are merged, meaning I’ll probably be painting in the red rather than the white.

Now, when I mentioned painting in the red, I’m sure the question of, “why don’t you just mask the pieces?” came up. Well, the most blunt answer would be that I’m a lazy asshat and dislike masking strongly after the hellhole that I went through masking the Master Gundam.
The answer that I like to give myself however, is that I wanted all the red on the kit to be consistent, and there were some parts that were extraordinarily difficult to mask and much easier to simply brush paint.
Wait, that’s the same thing, isn’t it? The second one sounds better, whatever.

Yeah, I used gloss red acrylic paint and hand-brushed all the red on this kit. Not a single bit was sprayed. When I first went into this, I knew it was a bad idea, but my incredible laziness ultimately won over, and that little devil on my shoulder kept reassuring me that it wouldn’t turn out that bad.
Hey, turns out it didn’t.
Painting wasn’t particularly difficult; after my success with the gloss red, I realized that most of this kit would be sporting acrylic brush paint anyways. I didn’t even apply everything in nice thing layers like a good modeler should; I glomped it all on in my usual fashion. This resulted in several pieces looking quite thick, especially with the gloss, but the finish actually wasn’t that bad (I expected it to be rocky road all over, brush strokes and all), and in the end even some gloss topcoat didn’t bring out its worst.

These are done in with a layer of white spray, whereas the rest of the little details will be filled in with acrylics. That backpack unit was an absolute nightmare; just looking at it made me turn away and want to avoid painting it for as long as possible.

Head unit with one coat of white and a red chin slapped on via brush paint. Yes, unfortunately only one head came with it; the original kit, as indicated by the instructions, sported a whole other swappable Gundam head, but alas I’m stuck with the frowny heat-sink face.

A side-by-side comparison of a painted-in leg vent and one with a thin coat of white spray over it. Yup, all the gray areas that I was too lazy to mask from the white were painted in with gloss gray acrylic. It certainly is tedious work, but less tedious than masking I personally think, and I have much greater control over the actual painting process.

White bits were, as I mentioned, a piece of cake. However, there are a lot of little details all over that need to be added in with acrylic.

A good amount done, though not topcoated yet. I tried to get even the smallest bits down, including the yellow insides of some of the skirt vents and the absolutely microscopic vulcans on the chest.

Tiny tiny yellow vulcans on the head were also painted, though the F91 doesn’t seem to sport any form of light-piping for its temples, so I’ll have to figure out a way to paint those in later.

Leg pieces just about done; while they are simple halves, there’s an entire rear calf thruster assembly that has to be inserted in-between.

Ready for some gloss coat on the completed pieces. The yellow parts don’t have the black filled in that they should because that’ll come later, on top of the gloss coat.

Shoulders getting some topcoat too; I actually didn’t realize that the actual F91 Imagine had a little white cutout on the edge of the shoulders, that they weren’t actually almost all-red. By the time I saw this (I was watching Build Fighters during the build to get me in the mood) it was too late to change anything lest I scrape off all the paint on the shoulders, so I just said screw it.

I do actually really like how the feet turned out; yes there’s a conspicuous seam line running smack dab down the middle, but thankfully the bits of unevenness in some of the painted areas are only visible when they catch the light just right.

After topcoating comes panel-lining, and given that this was an almost all-white suit, there was certainly much to be done.
So about those black areas that should be filled into the yellow; the rather thick combination of acrylic brush paint and topcoat made the grooves and defining slopes of the plastic a bit hard to see, especially while brush painting. To counter messy painting (which has happened to me a lot in the past – I’d always try to do pieces like these and end up with them turning out really sloppy), I opted to use my panel-lining marker to outline the shape of the area I needed to paint first, then do the actual painting.
This method actually worked really well for most of the kit; for the gloss black all I had to do was paint within the drawn borders and everything turned out smoothly.

Starting work on that backpack unit that I dreaded so much. Looking at the reference images, this area is actually quite complex, though Bandai just gives it to us all as one big white block and solves things with stickers.
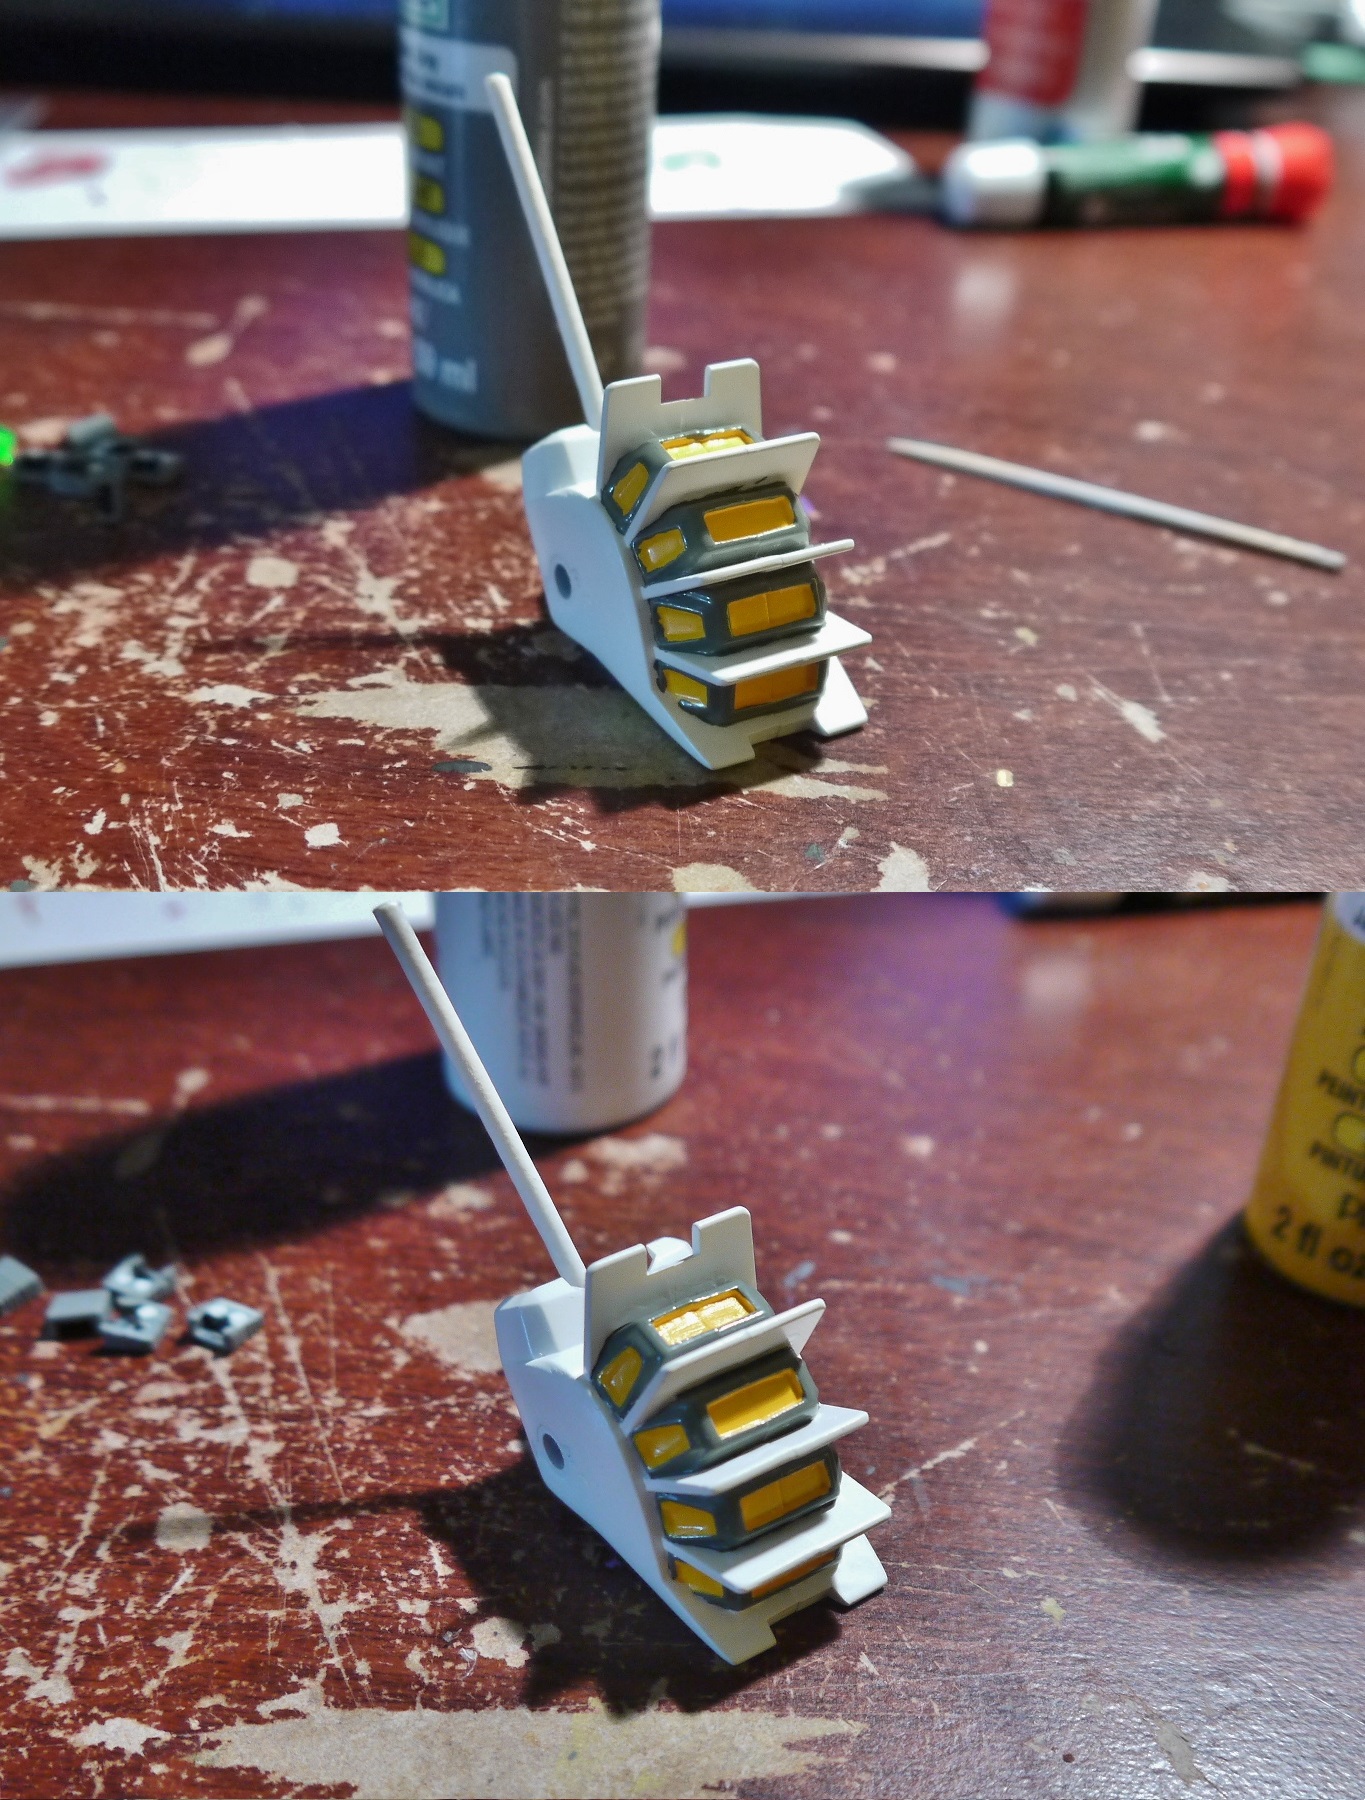
This was the tricky part. Keeping the gray bits constrained to their proper areas without bleeding into the yellow and white took a lot of going-back and touching-up. The first image is what it looked like before some further touch-ups.

And just about done, just need the center black bits to paint in. The problem, however, is that the middle sections actually had stickers with the black bar that was supposed to go in the middle, and relied solely on that. There were no panel lines or raised edges for me to go off of. The middle sections were just flat, and I had to figure out a way to paint a black bar in there by hand. I left it like this for a while whilst I moved onto other parts of the suit though, it was a smaller detail that I could fill in later.

As a bit of an experiment for this project I decided to pull out a long-forgotten resource that I’ve had for probably over a year in storage.
I got these metal mesh sheets a long time ago when I attempted to mold a medieval European Knight out of clay. I had tried to use the metal as a framework, but it didn’t exactly work out very well…we won’t get into that. Anyway, I pulled these out and figured it would be nice to use a tiny bit on the F91 to see how it looks.

I only used a microscopic bit for the vent areas – they just looked so dull being plain black, and I was inspired by this particular work that I was using as reference:

While the mesh they used is much more fine, I don’t think what I ended up with turned out too badly. Also, that build is gorgeous – check out the rest of the photos here.

Moving right along, getting the eyes done in the usual manner. I realized after the Wing Gundam Fenice that leaving the eyes clear green isn’t as effective as painting them in metallic, as the clear green eyes usually don’t have light piping and thus just look dead.

So, with ‘most everything else done on the main suit, it was time to move onto the main show – the missing VSBR replacements.
I knew I wouldn’t be in any trouble when I picked up the F91 and noticed it was missing a VSBR because my buddies and I had already picked these up at AX from a generous booth called Robots4Less. They were giving these Builders parts out for free to people who entered or passed by their shop. The HG Customize Campaign is, of course, supposed to be free anyways, but I’ve yet to see any retailer just pass them out totally free. I know the Bluefin booth and some online sellers bundle these in when you make a purchase, but Robots4Less live up to their name by just handing them out to bystanders.
Of course, each person got one and three of our party including me passed by, so we each got a Builders part. I personally received a D set, while one of my pals got a F set and the other another D. My friend who had gotten the other D set was generous and gracious enough to just let me have his, as he didn’t know what he would be using it for anyway. My other comrade with the F set dug the gatling gun and actually had HGBF kits to use it on.

These sets are more than just a single weapon though – they actually include multiple adapter parts for several of the newer HG kits, with emphasis on allowing part swapping, therefore allowing modelers to preform non-destructive kitbashing. Despite the several types of beam saber hilts included though, no actual beams came with the set.

So while set F sported a gatling gun as its main feature weapon, the D sets featured what looks like a plasma cannon of some sort. It kind of reminds me of the Lohengrin positron cannons from Gundam Seed.

Test fitting them under the assembled arms. I couldn’t actually attach the arms to the main body until I had the cannons done, due to the lack of pegs and the way the joints were fitted. Compared to the original VSBR’s, these new cannons were extraordinarily bulky. To counter that I needed to shave off quite a bit of its details.

I went in with my exacto and carved off the tubing details on the back end of the cannon. It didn’t really fit the look and feel of the rest of the F91 anyways.

A quick look at the legs while I was working on the cannons. The seam line running down the entirety of the leg is an eyesore, but not something I usually worry about. I’m liking how the hydraulic pistons in the ankles look.

Mostly assembled! Though the arms still can’t be held up on their own. The fitting seems sketchy to me, but without an actual reliable way to test fit things, I just went ahead with what I had.

Figuring out a way to connect the cannons to the little peg stubs on the F91 wasn’t much of a challenge; I’ve gotten a bit more used to pla-plating now.

Peg arms attached. Had to add a few pla plate coverings here and there to make up for some sloppy cutting when I removed the tubes.

Speaking of those coverings, there was this nasty little crater on top of the F91’s backpack. It was part of the original kit as I got it; I didn’t actually mess up and cause that. At first I thought it was such a small little blemish that it didn’t matter, but eventually I just had to do something about it.

Ended up covering it up with some thin pla-plate, though matching the sprayed white paint with gloss white acrylic was a challenge to say the least. I don’t think it looks too horrendous on the final product.

While I was working on the cannons and doing continuous test-fitting, I realized that they just looked too dinky. The original VSBRs were extraordinarily long in comparison to my modded cannons, so I figured I’d try to extend them a bit.

I was very hesitant to do this at first due to the fact that I figured my plain pla-plated parts would look out of place compared to the rest of the detailed cannon. To counter that, I went ahead and removed even more detail on the cannon, matching it more with the aged look of the F91 itself.

Nothing complicated; just added a longer barrel section to the tip of the cannon.

The original versus my revised version. Not half bad, I think.

Sprayed them both down with a few coats of white as the main color and proceeded to add the rest of the details in with brush paint.
The end product, attached to the F91. They’re actually a tad shorter but almost the same length as the original VSBR now.

…but then the VSBR actually opens for the handle to pop out and the entire thing is extended. All in all I think it turned out well, I’m pleased with the results. The cannons do actually slide from standby on the backpack to firing position pretty well, though I’ll go into detail with this later.

With the new cannons done, I still had another part that I needed to make – a new shield generator. The original kit had the F91 sport a standby one on its arm and a separate one that was to be permanently attached to the actual beam shield effect. I only got the one that came with the shield, so I had to use it to create a new piece for use in standby mode.
As usual, I employed the clay molding method with this one, since it was a pretty basic piece to mold and carve out.

Thankfully I made two copies at the same time, because I was careless again and ended up shattering one of them. As long as I have that original purple mold though, I can make as many as I want.

I wanted to keep to the original kit functions and have this piece be removable, instead of simply gluing it into the forearm casing. To do so, I made two pegs that fit the arm casing out of spare runners, and then dabbed some paint on them as I inserted them into the arm for a test fit. With wet paint on, I put the newly molded shield piece on to figure out the places where I would have to glue the pegs on.
I didn’t just stick the pegs in there, add the glue on them, and attach the shield piece for fear of the glue getting messy and sticking things where they weren’t meant to stick.

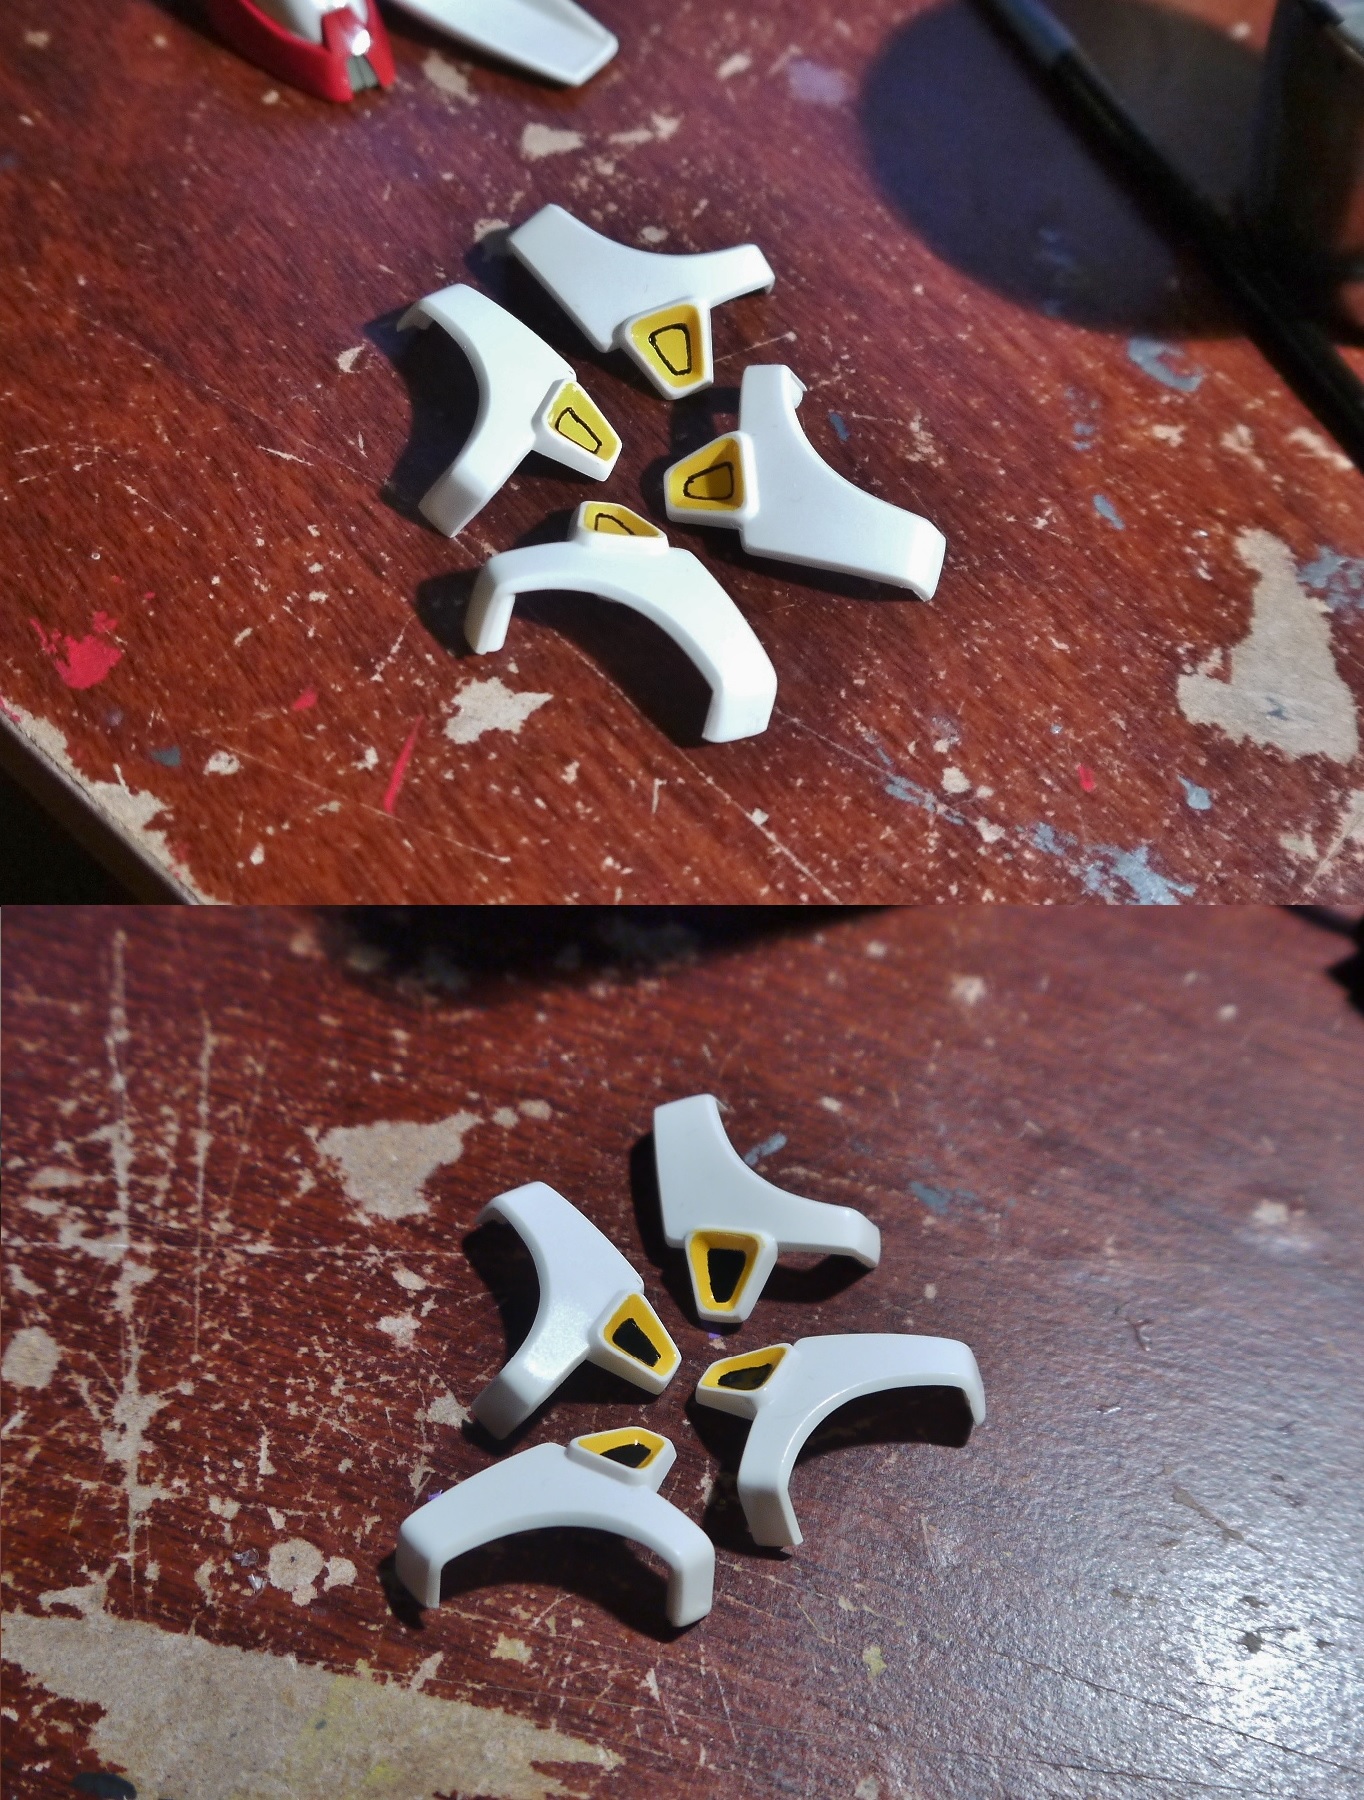
Before I moved onto the weapons, there was still a problem to be solved – the black stripes on the F91’s backpack. After seeing no way to really paint them in there by hand, I decided to basically craft and use stickers of my own – the only time you’ll see me do this.
With that thin Testor’s Masking Tape, I went ahead and cut a few strips to size and painted them black. Once they had dried, some careful masking application resulted in the desired result. I never thought I’d have to use masking tape as stickers.

Moving onto the last bit – the weapons. I usually hate working on these after I’ve already finished a kit, but after working on the new VSBR cannons, it wasn’t so much of a hassle.
The beam rifle here came in all gray, though it’s supposed to have a white casing. To achieve that, I just went ahead and painted it all white, with the intention of adding the gray via brush.

The bazooka is inverted – I painted it all gray to cover up some nubs and add an even finish first, despite it being gray before.

Then I masked said gray parts that were to be kept and sprayed the rest white. The masking turned out fairly well, though there were still some areas I missed or accidentally masked, so they had to be painted white or touched up with gray. Panel lining this beast was a royal pain in the arse.

The last bits, the butt of the bazooka and the shield pieces getting sprayed down before some brush detailing.

The spray palette for this project. Yeah, I’m not even joking. These were all the sprays I used, and very little on the gray.

The bottled palette, however, is significantly larger. I actually went out and got a few new gloss acrylic paints just for this kit, though of course they will be used in the future as I continue this trend. The black isn’t Apple Barrel because the craft stores I frequent to purchase these are always out of stock. The metallic blue was also used for the scopes and cameras.

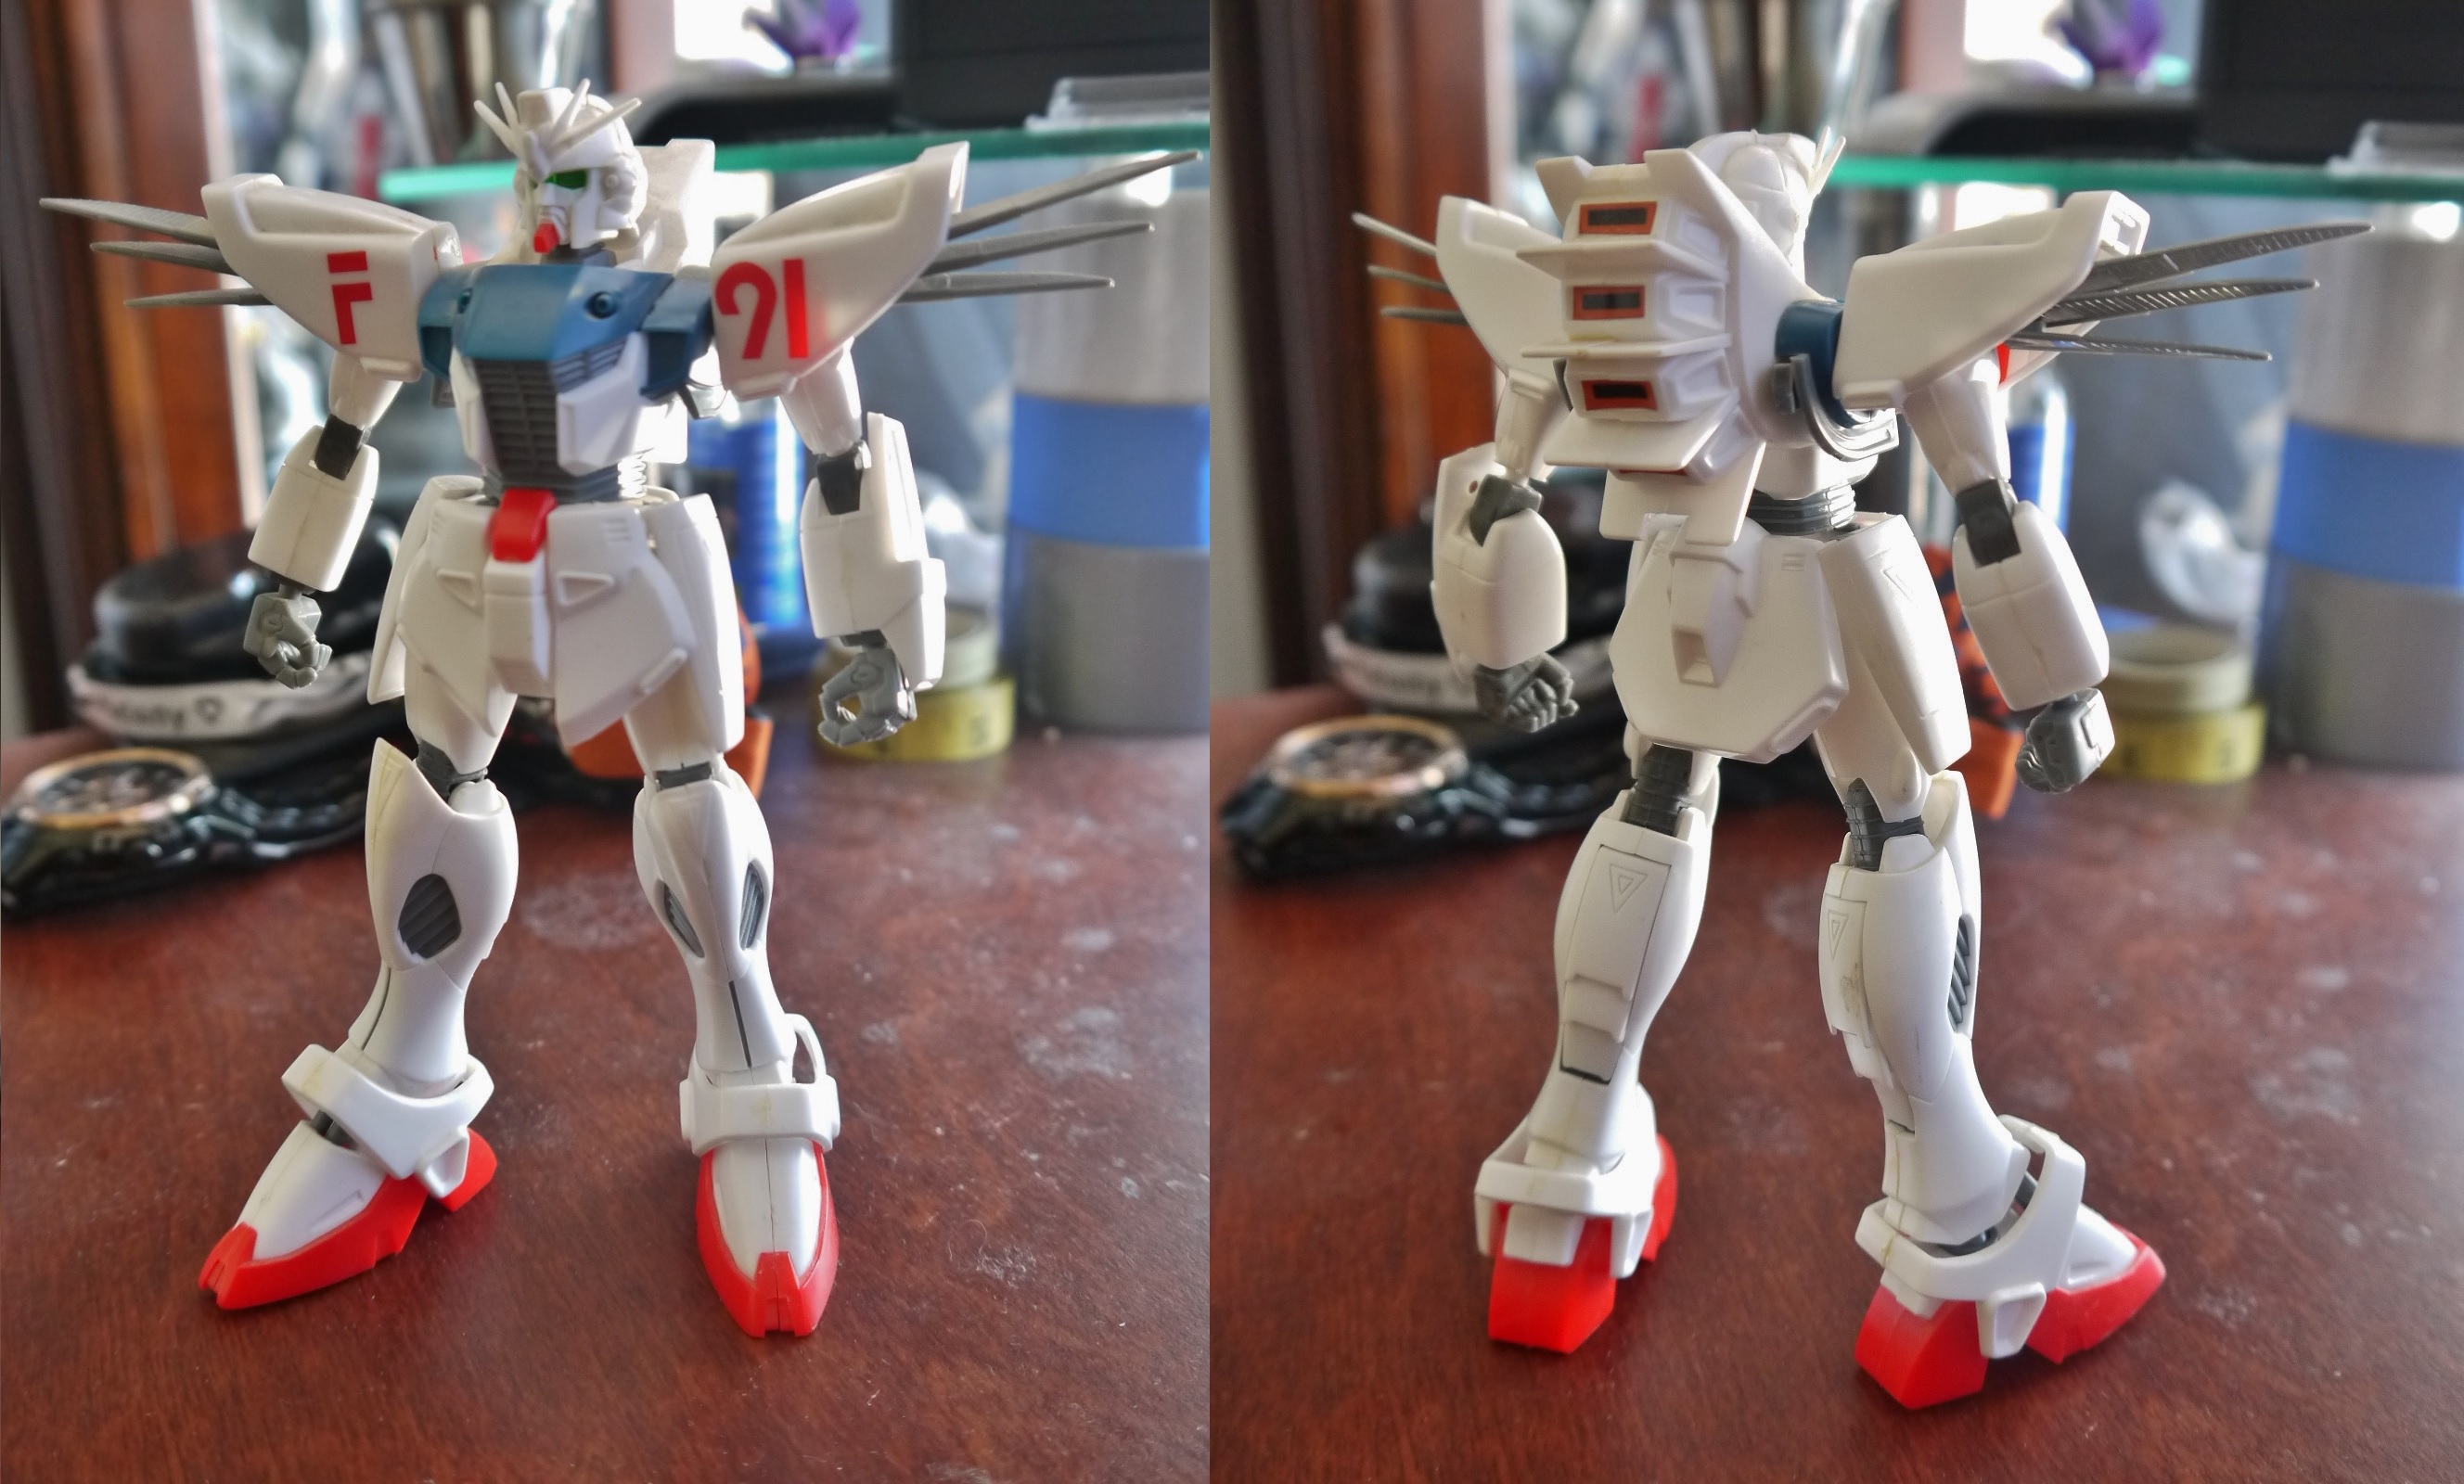
And at long last, the finished product. The color scheme hasn’t changed much from the original F91, though I am very proud of the custom cannons and the little yellow details throughout the suit.

I’m really liking how the head turned out. The v-fin, vulcans, and forehead camera just look so clean, I am most proud.
The F91’s age does show a fair bit in its articulation and build, but surprisingly not so much in its aesthetics. I don’t think it’s worlds away from its modern HGUC counterpart, unlike some of my other 1/100 Custom kits.
Most of the limbs can’t bend any more than 90 degrees, and while the skirts do technically articulate, their own bulk gets in the way.

So, about the new cannons – first off, they work! I was worried while working on them that they wouldn’t actually come forward, be obstructed by the waist, wouldn’t be reachable by the arms, etc…but everything turned out all right.


The hands don’t actually wrap all the way around the handle, but due to them actually being semi-articulated fingers, it ends up with a passable look. Due to the fixed nature of the cannons though, they can’t really be aimed; F91 would have to turn its whole body in the direction it wants to fire.

The connecting joint is pretty sturdy, given that I slathered it in Krazy Glue, but sometimes I still fear for it coming apart. Unlike the original VSBR, there aren’t any sort of steadying clamp that clips onto the rails beneath the shoulders.

Despite their proclaimed functionality though, I do have to cheat a bit sometimes. The cannons do actually rub against the side skirts whenever I bring them down, and they’re a pretty tight fit between those and the arms. As a result, it’s usually easier (and safer) to separate the kit at the waist, bring the cannons down, and then reattach everything.

They also had a cool little design inside the barrels that I went through the trouble to paint yellow with a toothpick.

I’ve now decided that the new VSBRs will now be designated the VSBCs (Variable Speed Beam Cannons), and the resulting upgraded suit will be called the F91 Imagine Kai. The Kai is just there because I’d rather not call it the F91 Imagine Norn. We all know the naming schemes here.

The F91 holds the honor of being the 1/100 Custom that comes with the most extra accessories. I’ll probably only be displaying it with the beam rifle and a VSBC out, but the bazooka and shield are nice to have. No extra Gundam head though, sad days.


The beam shield effect part is actually pretty cool, especially in light of its age. As always is the problem with these though, it’s too large and cumbersome to pose well with. It’s pretty much physically impossible to have the F91 just standing there with the beam shield active; the shoulder fins get in the way.

I’m digging the little mechanical piece that extends the shield though. I added a bit of paint detail, as it was originally all gray. The tip area is actually tilted forward a bit, so the shield isn’t completely parallel to the arm when active.

The completed ankle and feet. The ankle armor likes to pop off occasionally, and since nothing is really pegged in it requires me to glue everything back together whenever that happens. Again though, I’m very pleased with how those ankle hydraulics turned out. They sink into the front of the foot when the F91 bends forwards, with the ball joint hidden behind it.

Opening leg armor action. Very impressed that this was even included on a kit as old as this, and it works very well. Due to the paint though, closing the flaps makes for a bit of a tight fit but overall it isn’t a problem.

The beam rifle isn’t anything special, a very surprising fact given the F91 is supposed to have come after we get stuff like the Unicorn’s beam magnum deployed in the field.


Though it initially had some problems wielding it, the paint managed to thicken things up enough that it works fine now. I’m particularly proud of how the rifle turned out despite most of it being brush painted.


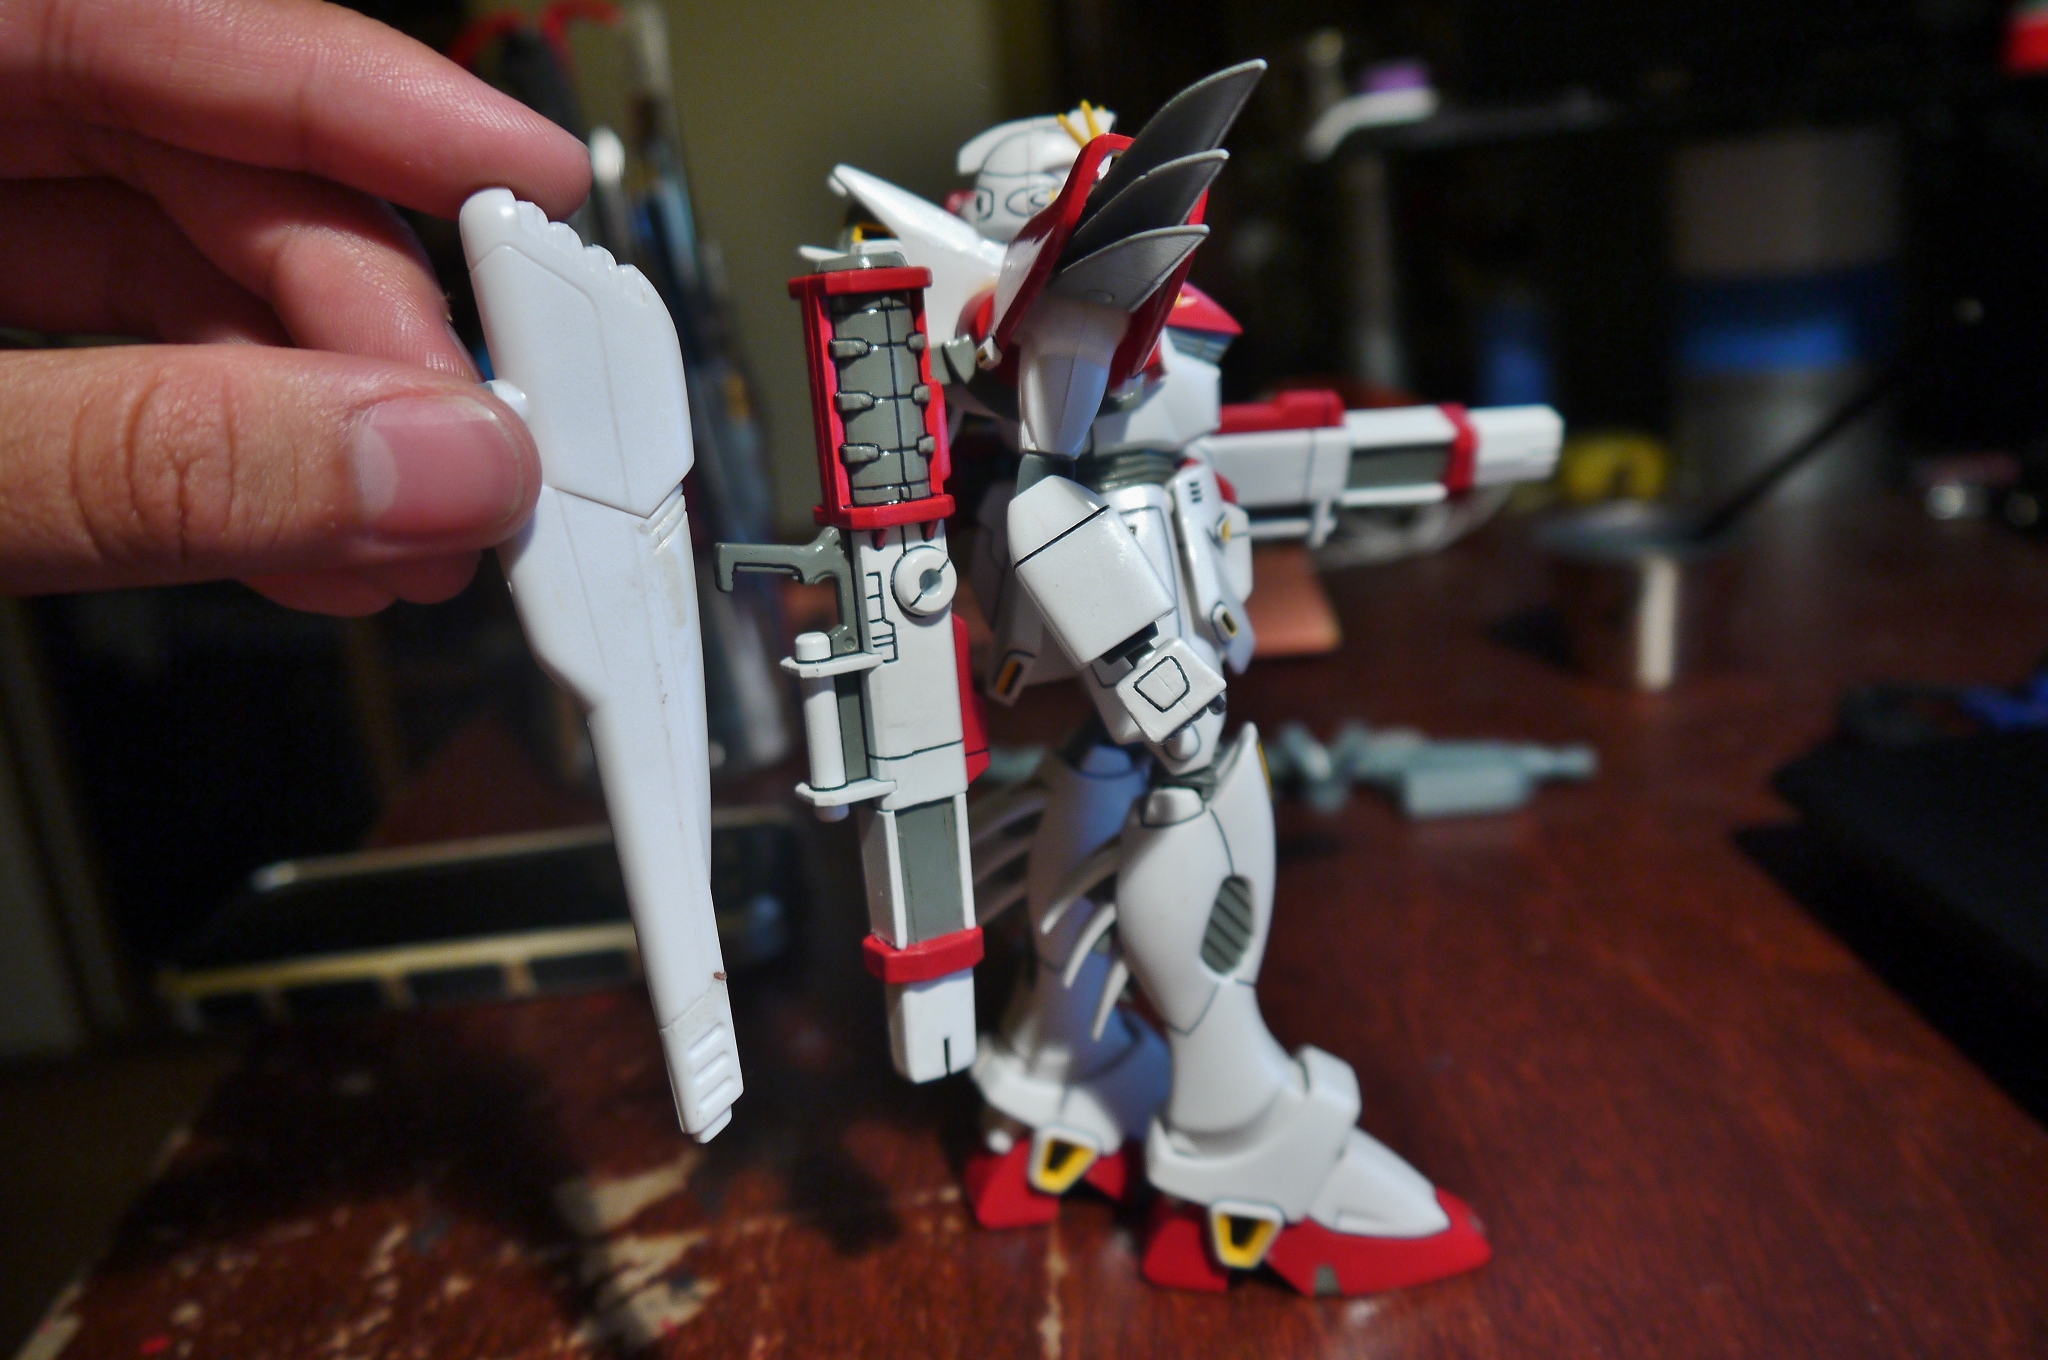
And lastly, the bazooka. This thing is apparently actually called the Beam Launcher and is pretty much a scaled up beam rifle (which means all of F91’s ranged weapons are basically beam rifles of varying speeds and power?) though I don’t actually remember F91 well enough to recall exactly how it worked.
I went through Hell and back panel-lining this thing, so some of it may be a bit sloppy in the areas where I just ragequit on it. It sucks when the paint negates the ability to rub off excess lines or correct mistakes.
There’s no mount for it on the rear skirt armor unfortunately, though I do like the bazooka’s aesthetics in and of itself. The F91 holds it fairly well, though I feel like the e-cap in the back should go behind the shoulder. Due to the lack of articulation in the arms, hands, and the actual bazooka handle itself though, the e-cap usually just rests against the shoulder.

With the fambam. Looks like I couldn’t quite capture Wing, oh well. The F91 is appropriately smaller than the others, though Master Gundam‘s scale is still a tossup.

All in all, I’m very pleased and even surprised at how this kit came out. I had resigned myself to subpar results when I went into this too lazy to mask or sand much, but as it turns out brush paints aren’t all that bad. Not that I intend to rely upon them exclusively from now on for future kits, but it certainly was a nice learning experience. Of course, the VSBCs are also my most major actual mod job to date, and they turned out pretty well.
Apparently the entire 1/100 HG F91 line was impressive too, though I wouldn’t really know about that as a whole so much as I can say the one kit I own from that line is very impressive. I have my heart set on a 1/100 HG F90 one day as well, that will hopefully join the family.
One Comment
darkandchoco/暗いとチョコ
Nice job! Looks awesome! 😀