

Pretty much a complete impulse buy from Michaels whilst I was out and rocking a 50% coupon this holiday season. I decided to give American automobile models another whack even after my previous bouts of successive failures in this department.
I’ve actually had my eye on this particular kit in the plastic models aisle for quite some time, but only sprang on it recently because I had a Masterpiece Sideswipe coming in the mail. I figured if I got his vehicle mode in roughly the same scale and customized it to look like the figure’s alt mode, it would make a great display and double as some painting practice.
During Winter Break, I had a brief and very welcome reprieve from schoolwork. So I threw myself back into my hobbies, building and painting two custom Master Grade Gundams back-to-back. After those, I was getting a little sick of Gunpla, but still wanted to complete a productive project before the break was out. As a result, on the last Sunday before school was back in session, I dedicated that entire day to this. I started work at 10AM, opening the box and inspecting the runners, painting and working at my desk all day until 12AM the next morning. Only food and bathroom breaks were allowed, with some untz untz wub wub pumping in the background the whole time.

As I mentioned, I’ve tried American model kits before – Michael’s has actually been my prime supplier for these, since I don’t know of any other stores that sell them. Yes, I do know that these are actually on the lower rung of American kits – Revell doesn’t exactly produce high-quality work, as will be evidenced throughout this post…

Despite being a sub-par kit through-and-through, I still buy from Michael’s for the fact that I’m not particularly inclined to do research and read through books-worth of forum pages to find what the community considers to be good kits. Not to mention these are pretty dirt-cheap; I believe this particular model was $10.

Officially licensed by Lamborghini, just like Masterpiece Sideswipe. You also get a bunch of fun info on the box about what paints to use (Revell works directly with Testors paints so you get that company’s paint names all over the box). I gotta dock Revell some points for the surprising lack of actual pictures of the kit on the box though. They show you like three (and not very detailed) pictures of a completed sample kit on the side. Guess I’m too used to all the action shots and OOB images on Japanese Plamo boxes.

The basic concept is the same as Gunpla, and it should be. Model kits seem to share a universal standard when it comes to building and assembling them.
The manual is a lot less builder-friendly for these kits though. While written entirely in English, I understand less of what it’s trying to tell me what to do than Japanese manuals.
Part of this flaw is that the parts aren’t drawn and shown in as much detail as Gunpla manuals. They leave parts placement rather ambiguous (i.e. glue piece A onto piece B – but at what angle?)

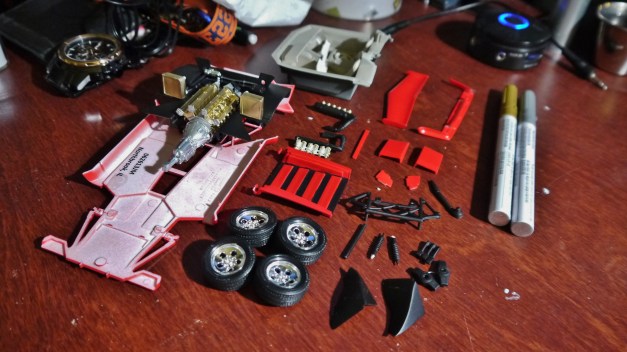
In addition, given that the entire kit comes in white with a runner of clear and chrome, just about everything needs to be painted. (Unless you want an all-white prototype-esque car).
This was the main reason why I avoided American kits. Painting galore, no pre-molded colors for you! (Revell Snap-Tite kits exempted from this rule). My past experiences painting such large surface areas such as car bodies yielded…less than promising results. The main issue was always dust getting stuck under the paint, resulting in lots of sanding, releasing potential lead paint particles into the air. Fun!

I made it a point to attempt to avoid such…hazards this time though. I cut the pieces out for painting before assembly, in the same fashion that I work on my Gunpla. These car models are a little more complex in their pieces though, and given that I’m not exactly an automobile maestro, cutting out the pieces without knowing their numbers or placement may have been a not-so-awesome idea. (i.e. I cut out this one suspension piston, but is it the left or right one? Does it go on the rear wheels or front?)
But it worked out in the end.
Also, there is no such thing as “snap fit” with these kits. While Revell does have a limited line of “Snap-Tite” kits, where everything is pre-painted and snap-together (like Gunpla, but much more basic), these higher-level kits require glue or cement to put everything together, making for a much messier build…

Chrome runner, hooray!
The plated silver actually looks kind of cheap, to be honest. You’ll see what I mean on the completed model with the wheel rims. I could’ve painted those away with a better looking silver finish, but decided against it for sake of laziness. There was already enough to paint.
Something I should mention that I was rather pleased with about the silver pieces is that the plastic underneath is a sort of clear/opaque white, unlike Bandai’s usual black. This means the nubs from the cut plated pieces are much less noticeable, given the clear white almost blends in with the shiny shiny silver.

Manual discrepancies made me rage a little. Further proof of this kit’s quality craftsmanship.
You can probably hardly see the numbers on the white runner parts, but basically the numbers for the pieces were switched. The manual labeled part 38 as 37, and vice versa. Not that it was such a huge deal with these easily distinguishable pieces, but still. Makes me feel spoiled to have built Bandai kits all my life.
Also, those letters next to the parts numbers are present throughout the manual. They represent what color the pieces should be – in this case, C was supposed to be gold. Basically their idea of a painting guide. The colors are all supposed to reflect what the actual colors of the parts are on the real car.

Given that this project was supposed to reach completion in a single day, I had to maximize my efficiency with putting it together and painting it. I’d cut out some pieces, clean them, and take them down to spray paint according to color. Then as they dried I’d work on another set of pieces of the same color. (i.e. cut out all the red pieces, paint them all at once and while they dried, I went back upstairs to my desk to cut out all the black pieces for painting after the red had dried).
Painting the large area of the car body actually didn’t turn out to be as difficult as I had experienced before or imagined when going into this project. I had painstakingly taken precautions to ensure dust would not fall on the pieces as I sprayed them (difficult with so much surface area) but a few specks had still found their way under the paint and created some unsightly finishes. Thankfully though, a few more coats of red managed to cover those up nicely, with the eventual clear coat sealing the deal for good. It ended up surprisingly smooth and even, with no sanding involved!

I used mostly spray paint for this project, after they had all been tested and proven as efficient and working. They were:
- Krylon Fusion For Plastic Gloss Red
- Spray Paint Matte Black
- Design Master Super Silver
- Design Master Metallic Gold
- Krylon Fusion For Plastic Beige
- Krylon Fusion For Plastic Clear (Topcoat)

Hooray! Masking works!
This particular piece was interesting – Revell went ahead and molded the car brand and model onto the tailpiece, but also included decals for them. The manual actually read, “if using decals, sand away the molded words and apply decal over.”
I found it unorthodox that they would actually willingly tell you to sand away detail like that. But alas, for the sake of matching the Masterpiece Sideswipe Transformer that this kit is meant to be a companion of, I sanded away the words and applied the decals.

The decals actually worked really well. I’m surprised by their quality and ease of application. I suppose part of it is the fact that I’m applying them to painted surfaces, where they practically melt into the pieces.

All the minute details on the main body and other miscellaneous pieces that couldn’t be masked and sprayed were painted in by hand via acrylics, as usual. There’s some pretty satisfying detail on the car itself. Had to do this all before it was sealed away with topcoat.

One of the most exciting parts of this kit for me, and the vital area that I simply could not afford to screw up. I wanted the car to match Masterpiece Sideswipe’s alt form nigh-perfectly, so naturally the large and prominent Autobot decal on the hood was essential.
I had ordered these waterslides a good long time ago just for this project, and they’re finally coming in handy!
I ended up using the smallest size on the sheet for the decal that would go on the hood, and it worked out nigh-perfectly. I’m extremely satisfied with how it turned out. It settled in nice and smooth, with no air bubbles or discrepancies. It almost looks pained onto the piece!

I should point out now that the nubs and piece connection system for Revell’s kits are rather strange. Rather than the minimal nubs that Bandai usually favors to connect pieces to the runners, Revell seems to go all out and give you wide wedges to link their parts to the gates. A good example is shown above with the bottom of the seats.
While this doesn’t prove to be much of a problem, given nub cleaning isn’t such a big deal because everything will be painted, it’s a new and strange thing to me.

In addition, as another testimony to the quality of this kit, many of the pieces such as the steering wheel sport excessive plastic flash (Extra plastic on the parts that weren’t molded completely). This is rare if not completely nonexistent on Gunpla, so it was a new experience for me to see it here.
None of the flash proved to be much of a problem, given it was all easily shaved off, but it was still rather unsightly to see it on a kit like this. Come on Revell, step it up.

Tires all put together. They actually appear to be a bit small for the actual car – I’m not sure if they’re completely in scale or if the Masterpiece Sideswipe images I keep referencing for this build just sport larger tires.
See: cheap-looking chrome.
Revell also provides actual rubber tires for the kt, which is a nice touch.

Most of the parts are painted by now, ready for assembly. The finishes sure look promising with the topcoat applied.
Some pieces, unfortunately, are rather warped right out of the box though. The biggest proponent of this issue is the main car body, which is slightly bent. I’m not sure of the reason behind this (packaging, perhaps?) but it certainly made assembly a bit more of a chore.

Some gold inner detail pieces.
Funny thing, I actually ran out of silver spray paint whilst working on this kit. While I was out spraying, the silver nozzle suddenly sputtered and died. Given I didn’t have the time or resources to go out and grab a new can, I just made do with what I had and sprayed some of the silver parts black or gold.
Most of the silver and gold parts were all for the inner mechanics like the engine and transmission, none of which I really cared for, given all I wanted was the superficial exterior of the car. I did however, still go through the rigors of painting those pieces though, just for the hell of it. They may not be entirely accurate to the real thing, but I could care less.

Some black pieces painted and ready for assembly. Some of these pieces are downright microscopic (such as the shifter in the cabin), which made the loss of parts a very real fear whilst assembling and painting this thing.

Engine painted, built, and ready to be inserted into the main assembly. These aren’t the actual engine’s real colors – as I mentioned before, I ran out of silver whilst painting, so there may be a bit more gold on there than there is on the real thing.
At first, I had actually wanted to just say, “screw it, I’ll save myself some trouble by putting the entire engine together first and just spraying the entire block a solid color, like black or silver.”
But then I thought, “I’m a modeler, aren’t I? It’ll be good painting practice…”
So I did it the long painful way, painting each piece individually and then assembling it into a multi-color abomination at the end.
Engine inserted, most of the bottom block assembly complete. Everything is topcoated, just waiting on the main body…
Those markers you see on the right there are metallic paint markers I also got at Michaels. They’re of the Craft Smart brand, and work extraordinarily well. They come out like chromed and plated silver/gold, and that set of two ran me about $2.00. I used them throughout this kit for touch-ups and whatnot, and I gotta say – I’m extremely impressed with what they can do.

Small runner of clear pieces for the windows and miscellaneous lights. I had special plans for these parts…

This is a bottle of clear black paint. I know, clear black? Sounds funky. But it should in theory, give a “tinted” effect to the clear windows for the car. I used the same brand for the clear red and orange taillights, which worked out great. But there was a slight…complication…with the application of this particular paint.
Long story short, the paint basically doesn’t take to large surface areas well due to brush strokes. I’ve tried thin and thick coats, nothing will do the job well on the large surface area of the windshield and side windows. It will always leave brush strokes, which turned out to be a massive eyesore. In the end, I ended up removing all the paint from the clear pieces (thank the heavens it came off easily) and just kept them clear. While not particularly satisfying (Masterpiece Sideswipe’s windows are tinted) I came to accept that these can only really be effectively applied in small areas. Only way I’m gonna get a nice clear effect on those pieces now is with an airbrush, and I’m too much of a poor, meek high school student to level up that high.

Now, actually putting the windows and clear pieces such as the headlights on is a different story. I used Krazy Glue to put this model together, but I learned the hard way with previous automobile model kits that it doesn’t work the same way it does with clear pieces…
Thankfully, Testors’ got you covered in these situations. I picked up this funky-looking bottle of clear parts cement quite a while ago, for a different model. (I actually used it to make windows for that kit, since I screwed up some clear parts. Yeah, this thing can double as a window-maker. As long as you have the frame, just apply a generous amount and it kind of gloms around, hardening into a clear film, clear as glass, around the piece in question).
Anyway, this thing does exactly what it says on the bottle. It’s essentially clear glue, to use for putting clear parts together so you don’t get any of that “fog” that comes with Krazy Glue when it dries.


A clear view of the rear engine assembly before the body is slapped over it. The thing is actually damn complicated – I don’t even know how many little tiny pieces went into the thing, but I can say this – gluing it all down and making it fit together was a royal pain in the arse. Thankfully none of it matters much once it’s covered up.

Last look at the body and everything before its final form ride. I’m rather proud of the detail on the spare tire in the hood – hand-painted with black and silver paints. Too bad I had to glue the hood down over it when the full thing was put together since there was no opening/closing mechanism like the rear engine block had.

So while final assembly was taking place, I ran into a hiccup of sorts…these tiny black spring-like pieces are supposed to go in the front wheel assembly, but they were notoriously difficult to get in. It just wasn’t possible. So given that they were the tiniest of detail pieces that would never be seen and I could hardly care about, I decided to just omit them from the final product.
That means two pieces went unused because I had too much of a hard time putting them in, but at the end of the day, it didn’t bother me much. Saved me a good twenty minutes or so of trouble and boosted productivity.

And there you have it – complete! A long day’s work paid off – this is the result of 14 straight hours of spray paint, electronic super joy, pain, tears, and back-breaking dedication.

All in all, I don’t think it turned out too badly. All it really has to do is look pretty in the shelf next to Sideswipe, and look plausible as his vehicle form.

The interior cabin was painted beige, although I do realize it almost looks white. I didn’t put as much effort into that area as I did some other places, given I figured it would be well-hidden thanks to tinted windows…unfortunately things didn’t go as planned.

I did go ahead and try to panel-line a good amount of the car, though I’m not sure how much actual panel-lining real cars have. You can see some nasty seams where the bottom of the main body connects to the top portion, but it couldn’t be helped. It was a tight fit when everything was put together, and I had to shift several things to make it work.

The lopsidedness of the main body pieces didn’t help either. Generally the poor fit of many of the pieces can be traced back to the kit quality and manufacturer.
Note that the rear side windows are experiencing some of that Krazy Glue fog I mentioned earlier that I deliberately tried to avoid. It’s not caused by that actual window piece, but rather another piece on the inside that was near it, which used Krazy Glue. The fog leaked onto the window, which is unfortunate, but can’t be helped.

I’m most proud of the smooth finish on the car overall. I’ve never experienced something like this, and given I didn’t have to do any sanding to achieve such a result, I like to think I made some leaps and bounds in the realm of custom painting.
I’m particularly proud of that engine cover piece on the rear top. It was sprayed all red and the black in-betweens were all painted in by hand.

A close-up look at the rear. Excuse the messy lining around the license plate – I’m pretty sure I just gave up at that point.
The decals on the rear turned out really well, as did the rear lights. I’m loving the clear red and orange.
Unfortunately, this is where you can most prominently see some connection issues. That nasty seam above the mid-bar where the top of the body doesn’t quite connect really bothers me, along with the not-entirely-connected section on the lower right there.

Bottomside, where you can still see the chrome and gold engine sticking out.

No, the tires don’t actually turn on any axles. And the car itself doesn’t actually sit very flat with all four tires touching the ground. I believe the culprit behind this is – once again – the lopsided body parts.
Note how the tires look sunken in the assembly. A real eye-sore, but as long as you don’t touch it, it should be okay…

Added the Lamborghini decals on the seats in the interior, even though they’re probably the last thing you’ll be looking at when viewing this kit.

One thing that really bothers me about the final assembly is the front turn lights(?) on the bumper of the car. Those tiny little clear lights at the very forefront.
During assembly, the chrome and clear pieces that were supposed to fit into that little area were too large to actually go in smoothly and flatly. As a result, I had to shave them both down considerably to make them fit, and even then they only ended up going in lopsided. Therefore, as can be seen clearly on the model, those two lights stick out sideways, instead of being perfectly flat and flush with the front bumper. Bugs me to no end, but I couldn’t fix it, unfortunately. Damn you Revell, for making unfitting parts.

A closer look at the interior of the cabin. I regret not going in and adding more detail in there, to bring out certain pieces like the steering wheel or seats. I painted some of the dash, but not much. It looks so boring in there…if only the clear black had worked out…

The engine block can actually open up, so thankfully the hard work I put into the engine doesn’t go entirely to waste.
Surprisingly, this action doesn’t scratch the paint. I was worried about opening it for the first time after assembly because I thought it would take some glorious red paint with it, but nope. It opens seamlessly.
There’s no handle or easy way to pop it open though. I found the most effective method would be to stick a toothpick up from under and behind the car, through the hollow innards assembly, and poke it open from underneath.
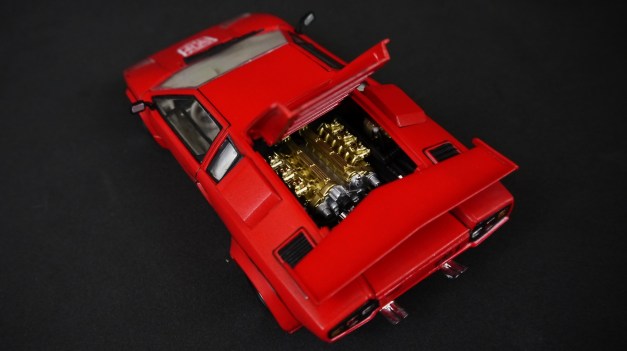
All told, it looks damn nice in there. The gold and silver do bring a certain air of glamour to it. Again, those colors are in no way accurate to the real thing, but my argument still stands that this is a Transformer, not an actual human automobile.


So overall in the end was it a success? I certainly think so. I like to credit this as my first actual successful build of an American model kit (my previous Audi R8, ’76 Camaro, and Enzo Ferrari can all rot in model kit Hell).
Again, the build did take the entirety of 14 hours, so it can be counted as a rush job. For what it is though, I’m merely glad it didn’t turn out to be as much as an abomination as my previous kits. I’m glad to at least have progressed from what I was before, and made some strides in painting. Can’t wait to see it next to Masterpiece Sideswipe!


One Comment
dietgilroy
Wasn’t this a MONOGRAM model first?
https://www.scalemates.com/kits/monogram-2769-lamborghini-lp500s–170939