

It’s almost been a year, and we’re back. Anime Expo is coming right around the corner again, which means, of course, that it’s time to build another armor.
Since Virtue’s reception and success last year at the Expo, there’s never been any question that my comrade and I were going to do it again. Unfortunately however, we seem to have lost a bit of our touch…either that or the suit design this year is simply more of a challenge. We like to think it’s the latter.
In tribute to the Unicorn Gundam OVAs which came in episodes, the entire project shall be documented here in Episodes, per time we work on it.

Last year’s armor, for those unfamiliar. For those interested, the entire making-of and performance at the Expo last year is documented, under the Anime Expo 2013 page.
Our goal of course, is to top what we’ve been able to do before, and of course we’ve learned from last year as to what not to do, like duct taping velcro and making stupidly massive side-skirts.

This is essentially Episode 0 because while we did attempt to start chipping out our new armor, things didn’t go as planned. The work done throughout this day can be considered more of a prototype test rather than anything substantial that will be final on the completed suit.
In less convoluted words, we screwed up this time, but we’re remedying it.

So it should be fairly obvious by now that we chose the RX-0 Unicorn Gundam (in Destroy Mode) as our suit of the year. It’s a rather large step up from the basic polygon shape that the RX-78-2 was last year, but Gundam Unicorn episode 7 will be screening at Anime Expo. Such a momentous occasion calls for great tribute and celebration.
To that end, we’re getting started early and (at least I am) giving obscene gestures towards the upcoming AP tests for school.
I’d be lying if I said I didn’t get a little discouraged when consulting online references though. I said the same for our armor last year, but this year it’s even more severe. While my partner has a more optimistic outlook, I remain unconvinced that we can do as well of a job as we aim for.

Unlike the costume above (kudos to them, you made me shed tears of blood), ours will not feature LEDs. Seems like too ambitious of an endpoint given our relative lack of experience. Want to take new things one at a time.

It seems to be easily removable too. With decals. We cry.

Ours was…um…meant to work that way…but ultimately at the ‘con we found out theories don’t always go over well pragmatically.

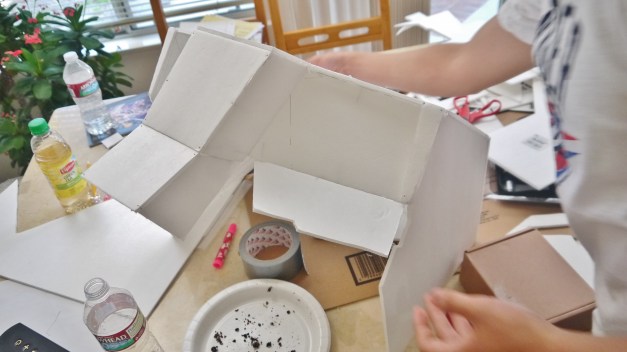
So we chugged along, this time working on my partner’s kitchen table instead of my garage. We were supposed to work in his garage, but due to a series of unfortunate events (more like one event) we were relegated to a more civilized air.

Unlike the RX-78-2, we’re planning on using foam board to build the RX-0. The surface texture of the cardboard last year didn’t roll too well with us, and overall it was very prone to bending, collapsing, ripping, etc. We figured foam board would be more stiff and be able to hold its shape much better, as well as be easier to work with. That and it’ll also be a breeze to paint.

Working hard on drawing out those paper schematics.

Ironically, we messed up during this round mostly because we totally ignored the paper schematics that my comrade drew up before hand. Once we actually got down to making the torso unit, we basically said “screw it” and used any arbitrary measurements we wanted. Just goes to show what looks good on paper doesn’t always translate well into reality. But the schematics do for sure look damn good on paper.

So as we’re chugging along, we’re not going to use duct tape to secure everything together as we did last year. Painting over the tape would be a problem, given the alternate texture it has relative to the boards. So my comrade’s mother actually came up with an ingenious idea…

She pulled a pin cushion with these handy little pins out of a kitchen drawer and told us it was great to use for temporarily holding foam boards together. Much relieved, since we didn’t have to crudely duct tape or glue things together without being sure about their fitting yet.

During the day I like to think we made some damn good progress. Too bad it was all moot in the end because we screwed up the proportions. Above is the upper torso starting to take shape, but notice how the front slant area looks a little too wide and large. Just too much surface area.

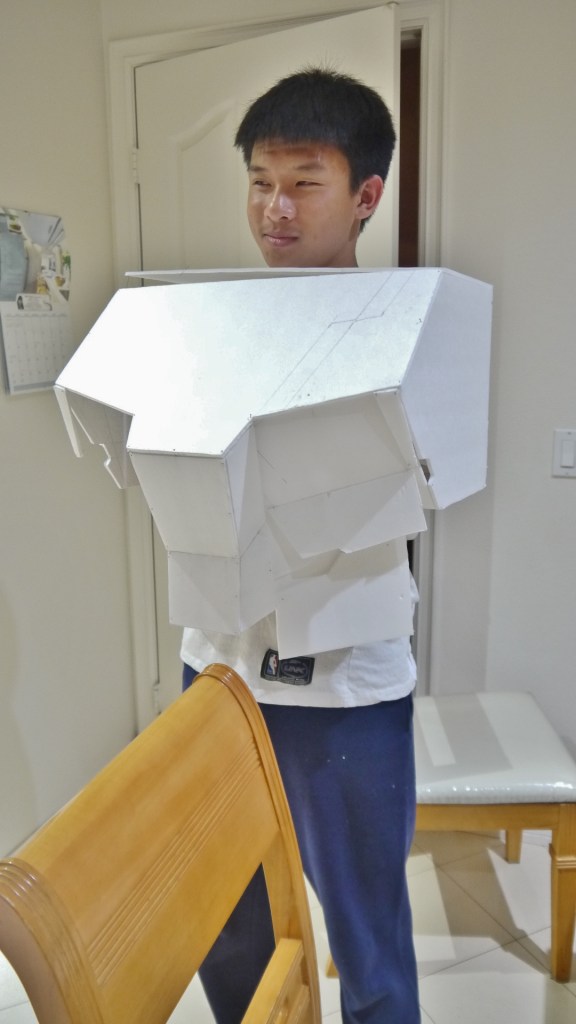
A quick test-fit. Upper chest looks way too large, doesn’t it? I suppose it’s hard to say since the rest of him is still disgustingly human, but it just looks…off.

Workspace got really messy really quickly. I’d like to point out that cutting out the foam boards was a miracle though – compared to the ordeal of cutting cardboard last year, this is an absolute breeze. Using a ruler and exacto-knife, the foam boards cut clean like butter. Made the going much smoother (literally).

As can be seen above already, I bought along my Master Grade Unicorn Gundam as reference for the project. We didn’t actually have an RX-78-2 kit to consult last year, so the presence of an actual physical reference point should make things a lot easier. I had suggested just taking the MG Unicorn’s measurements and blowing them up proportionally to fit my partner, but unfortunately he made a valid point on not having Gundam proportions.

Note how the torso block above now looks slightly smaller and less wide. We went ahead and had to modify the entire top piece because of the largeness I pointed out above. Still doesn’t cut it though.

Cockpit block pinned on and vent slots starting to take shape. Just looking at the cockpit block, it doesn’t look to be actual Unicorn proportions…

Pins kept falling apart as we worked with the rest of the suit. We’re planning on painting over the white board in a semi-gloss or gloss white for a smooth finish, and hopefully keeping the pins in there to look like rivets or some such.

Started getting the vents down. They look rather large, hmmm? They’re supposed to be more narrow, but again, we screwed up on proportions this time around.
We did, however, have a genius idea with the vents – basically we scored the lines on them with a knife and peeled off the paper on top of the foam to create the vent design shown above. Pretty damn genius, if I do say so myself. Otherwise we would’ve had to draw the lines in or keep them really thin.

Quick interlude – took some time out to bake a cake. Yes, we do this regularly and yes, it is perfectly normal.
Note the poorly written NT-D on the top right of the cake in chocolate sprinkles.

I forgot what cake mix we used but hey it was Hershey’s Cookies’n’Creme Premium Frosting that worked some of the magic!
It was actually damn good cake.
Back to work, mock-up vent pinned in as a placeholder for the real things. The vent flaps obviously look too small to actually be able to fold up and cover the vent itself, but our excuse is that on the Master Grade kit, the vent cover actually slides back under the vent, therefore making it shorter and smaller.
So for paints this time, we don’t have to go as crazy as we did last year. Unicorn uses an even simpler palette than the average lead Gundam after all, and most of it is just white. For the red psycho frame though, we wanted to try something new…

This is Krylon Cherry Red Glitter Blast Spray. I know, sounds exciting doesn’t it? It claims to be able to “create an intense sparkling glitter finish on any surface”
We had our reservations about using it, but then we tried it…

Damn that’s some glittery, shiny stuff. And it looks gorgeous.
We were pretty stoked about the results of the spray; the glitter looks exactly like the psycho frame glow and sparkle from the anime! Should’ve used this on my actual kit…

I mentioned not wanting to use duct tape above. But the pins aren’t sturdy in the least (they fall out way too much for my liking) so we need a solid way to attach the boards together at the edges and seams.
So we decided use glue…hot glue would’ve been ideal, but we ended up using our back-up alternate first, shown above. I picked it up at JoAnns for the project, but the thing is like a serious safety hazard…on the back it reads kidney damage and other discouraging, life-threatening things. But hey it’s heavy duty industrial glue, so at least it’ll hold the boards together!

Looking like a disaster area, but nearing the end of the day…

Some duct tape was still used, though mostly on the mock-up pieces as a temporary hold for the inside areas. Some areas are just so sketch, like that stomach flap shown above…

The lack of any actual schematics to follow probably wasn’t the best idea…which is why we pretty much have to scrap all this work and start from scratch. Should’ve learned from last year…

By the end of the day, this is what we had. Not too bad progress-wise; we did about the same amount on the first day with the RX-78-2 last year, though that time it actually looked legitimately proportionate…how we ever pulled that off I’ll never know.

My comrade also gave me a little something to take home to work on…of course I’m not keeping it, but it’ll be a small side project for a bit.
I almost feel cheated that this particular bout didn’t yield anything substantial…but at the very least we had a chance to work with the materials and hopefully become more efficient as the project progresses. My comrade’s thankfully already remedied most of the issues we faced here on his own, crafting new parts for the torso sides. The cockpit hatch area, we don’t even know…
Either way, I think we’re off the ground and kickin’. Roughly three months to Anime Expo, the countdown begins.
Read on the rest of the build:


